|
|
|
Kategorie
|
|
Informacje
|
|
Polecamy
|
|
|
 |
|
|
Dla tego produktu nie napisano jeszcze recenzji!
 ;
Szybko, sprawnie i tanio. Serwis godny polecenia. Będę polecał innym
 ;
Ogólnie jest OK, z wyjątkiem obrazu płyty głównej, który jest miejscami mało czytelny, ale można sobie poradzić.
;
Dokładna dokumentacja, pomogła w szybkiej naprawie telewizora. Dziękuję!
;
jedyne do czego mogę mieć zastrzeżenie to jakość zdjęć zawartych w przesłanej instrukcji serwisowej ponieważ są fatalnej jakości, praktycznie nieczytelne. tak poza tym jestem zadowolony to jest to czego szukałem.
;
Wszystko w porządku.
Instrukcja czytelna i kompletna.
Dziękuję.
all right!
thank you.
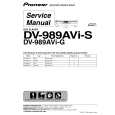
<Notes> 1. When installing the clutch, align the end face of the clutch to the shaft groove and align the hexagonal screw to the milling cutting surface. Insert the projection of the clutch and the gear arm in the hole of the bracket. 2. Confirm that there is no oil, etc. on the surface of the paper feed roller or the separation pad. 3. When reassembling the timing belt (removed when taking cut the pick-up roller) pass it through the upper side of the belt tensioner. 4. When installing the separation pad bracket to the copier, first free the paper stop lever by pushing down the pick-up roller downwards.
Note 1: Note 1: Put the projection Put the into the bracket hole into the
Note 1: 1: Put the projection into the he projection into the bracket hole ket hole
Align with the groove Align with the groove
<Illust
Mar. 1998 © TOSHIBA
6 - 13
1550/1560 DRIVE
|
|
|
> |
|