|
Dla tego produktu nie napisano jeszcze recenzji!
 ;
Wszystko w porządku.
Instrukcja czytelna i kompletna.
Dziękuję.
all right!
thank you.
;
Bardzo dobra instrukcja. Zawiera wszystko co potrzeba, polecam!
 ;
Instrukcja jest OK. Schematy czytelne, opisane niektóre procedury.
;
Instrukcja bardzo czytelna. zawiera co potrzeba. Polecam
;
...instrukcja serwisowa w pełni czytelna i kompletna. Dziękuję!
THERMISTOR AND THERMOFUSE REPLACEMENT
14 August 1997
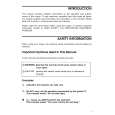
9.6 THERMISTOR AND THERMOFUSE REPLACEMENT
[C] [A]
[B]
[B]
A217R514.cdr
[E]
[D]
A217R515.cdr
1. Remove the fusing unit (see Fusing Unit Removal). 2. Remove the fusing unit cover [A] (1 screw). 3. Disconnect the fusing lamp harnesses [B]. 4. Remove the fusing upper cover [C] (4 screws). 5. Remove the thermistor [D] (1 screw, 1 connector). 6. Remove the thermofuse [E] (2 screws).
48
|