|
|
|
Kategorie
|
|
Informacje
|
|
Polecamy
|
|
|
 |
|
|
Dla tego produktu nie napisano jeszcze recenzji!
 ;
Dokładna dokumentacja, pomogła w szybkiej naprawie telewizora. Dziękuję!
 ;
jedyne do czego mogę mieć zastrzeżenie to jakość zdjęć zawartych w przesłanej instrukcji serwisowej ponieważ są fatalnej jakości, praktycznie nieczytelne. tak poza tym jestem zadowolony to jest to czego szukałem.
;
Wszystko w porządku.
Instrukcja czytelna i kompletna.
Dziękuję.
all right!
thank you.
;
Bardzo dobra instrukcja. Zawiera wszystko co potrzeba, polecam!
;
Instrukcja jest OK. Schematy czytelne, opisane niektóre procedury.
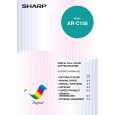
ADJ M1 DV doctor gap adjustment
This adjustment must be performed in the following cases: � When the developing unit is disassembled.
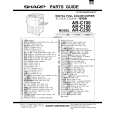
3) Hold the string and put the needle horizontally and move it toward the MG roller. (Do not use a clip which is too big to have a correct position.) 4) With the needle tip at 2 � 3mm from the MG roller surface, mark the point on the surface which is on the extended line of the needle tip. (Do not make contact between the needle tip and the MG roller.) 5) Measure the distance between the marking position and surface P of the developing unit, and check that the black unit is 13mm, color unit 24mm. If the distance is not as specified above, loosen the fixing screw A of the main pole adjustment plate, and move the adjustment plate in the arrow direction to adjust.
� �
When the print density is low. When there is a lot of toner dispersion abnormally. 1) Remove the developing unit from the copier, and remove the developing unit cover and the blade cover. 2) Loosen the DV doctor fixing screw A. 3) Insert a 0.525 thickness gauge at the point of 40mm � 70mm from the DV doctor edge.
4
mm
0
3
mm
0
3
mm
0
4
mm
0
2 ~ 3mm P
4) Push the DV doctor in the arrow direction and tighten the DV doctor fixing screw. (Perform the same procedure for the front and the rear frame simultaneously.) 5) Check that the clearance is 0.525 ± 0.03mm at two positions which are 40mm � 70mm from the both sides of the DV doctor.
2 ~ 3mm
�
When inserting the thickness gauge, be careful not to scratch the DV doctor and the MG roller.
A
13.0mm
black
2 ~ 3mm
A
24.0mm
ADJ M2 DV roller main pole position
adjustment
This adjustment must be performed in the following cases: � When the developing unit is disassembled.
color
� �
When the print density is low.
When there is a lot of toner dispersion abnormally. 1) Remove the developing unit cover and the blade cover, and place the developing unit on a flat surface. 2) Tie a string to a needle or a pin.
7�4
 $4.99 AR-C150 SHARP
Schematy Zestaw schematów dla tego urządzenia. Plik PDF zawierający schematy będzie dostarczony na Twó…
|
|
|
> |
|