|
Dla tego produktu nie napisano jeszcze recenzji!
 ;
jedyne do czego mogę mieć zastrzeżenie to jakość zdjęć zawartych w przesłanej instrukcji serwisowej ponieważ są fatalnej jakości, praktycznie nieczytelne. tak poza tym jestem zadowolony to jest to czego szukałem.
 ;
Wszystko w porządku.
Instrukcja czytelna i kompletna.
Dziękuję.
all right!
thank you.
;
Bardzo dobra instrukcja. Zawiera wszystko co potrzeba, polecam!
;
Instrukcja jest OK. Schematy czytelne, opisane niektóre procedury.
;
Instrukcja bardzo czytelna. zawiera co potrzeba. Polecam
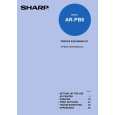
AR-PB8
G. PWB cover installation � Install the PWB cover with screws.
4. PS kit (AR-PS1) installation
�
Fix the PS PWB with pawl.
�Note: The DIMM connector and the PS-PWB are provided with the reverse insertion protection key(notch). A strong push, however, allows reverse insertion. Use great care of the inserting direction.
3. Expansion memory installation
�
Fix the memory PWB with pawls.
5. Network Interface Control PWB installation
�
Insert the network PWB into the printer PWB connector and fix it with screws.
3�3
|