|
Dla tego produktu nie napisano jeszcze recenzji!
 ;
Dokładna dokumentacja, pomogła w szybkiej naprawie telewizora. Dziękuję!
 ;
jedyne do czego mogę mieć zastrzeżenie to jakość zdjęć zawartych w przesłanej instrukcji serwisowej ponieważ są fatalnej jakości, praktycznie nieczytelne. tak poza tym jestem zadowolony to jest to czego szukałem.
;
Wszystko w porządku.
Instrukcja czytelna i kompletna.
Dziękuję.
all right!
thank you.
;
Bardzo dobra instrukcja. Zawiera wszystko co potrzeba, polecam!
;
Instrukcja jest OK. Schematy czytelne, opisane niektóre procedury.
1
2
3
4
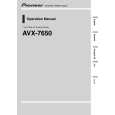
- Removing the Display Assy (Fig.7)
Display Assy
A
Holder
1 2 3
Remove the two screws and then remove the Holder. Remove the three screws and then remove the Cover Unit. Remove the four screws.
1
1
3
3
Disconnect the connector and then remove the Display Assy.
B
3 2 2 2
3
Cover Unit
Fig.7 - Removing the Monitor PCB (Fig.8)
1
C
Straighten the tabs at two locations indicated.
1
1
2
Remove the screw.
Disconnect the connector and then remove the Monitor PCB.
D
2
Monitor PCB
Fig.8
Note: Tighten the screws with the panel in warped state as shown in the photograph below. Otherwise, it will be difficult to install Detach Grille Assy to Panel Assy.
E
F
88
AVX-7600/EW
1 2 3 4
|