|
|
|
Kategorie
|
|
Informacje
|
|
Polecamy
|
|
|
 |
|
|
Dla tego produktu nie napisano jeszcze recenzji!
 ;
Dokładna dokumentacja, pomogła w szybkiej naprawie telewizora. Dziękuję!
 ;
jedyne do czego mogę mieć zastrzeżenie to jakość zdjęć zawartych w przesłanej instrukcji serwisowej ponieważ są fatalnej jakości, praktycznie nieczytelne. tak poza tym jestem zadowolony to jest to czego szukałem.
;
Wszystko w porządku.
Instrukcja czytelna i kompletna.
Dziękuję.
all right!
thank you.
;
Bardzo dobra instrukcja. Zawiera wszystko co potrzeba, polecam!
;
Instrukcja jest OK. Schematy czytelne, opisane niektóre procedury.
1-30 BVM-D32E1WA/D32E1WE/D32E1WU
Chapter 2 Menu
[C7] Adjusting Beam Landing and Digital Uniformity (SET UP 7) � WHITE UNIFORMITY Menu
Setting Lists of the WHITE UNIFORMITY Menu
This section explains the setting lists displayed in the menu. How to read the setting lists � For purposes of explanation, each setting list is preceded by a menu number. These numbers are not displayed on the screen.
For more information about the menu number, see �About menu numbers� on page 23.
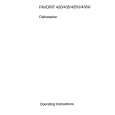
[C721] SET PROBE ON CURSOR To perform adjustment, operate the BKM-14L as follows: (1) Place the BKM-14L to the cursor displayed on the bottom left of the screen. ÷ The adjustment starts. �IN PROGRESS� appears during adjustment, and the cursor is displayed at the next adjustment point when the adjustment is completed. (2) Move the BKM-14L to the cursor. ÷ The next adjustment is performed. In the same way, adjust each adjustment point guided by the cursor. When the adjustment of all the points is completed, the screen automatically returns to the WHITE UNIFORMITY menu (1/2) ([C7]). To cancel the adjustment Press the MENU button. The adjusted data is cleared and the screen returns to the WHITE UNIFORMITY menu (1/2) ([C7]). If the BKM-14L is not placed to the cursor The following message appears, and the cursor moves to the right and left alternately on the screen. DO YOU WISH TO ABORT? LEFT CURSOR: ABORT RIGHT CURSOR: CONTINUE To abort, place the BKM-14L to the cursor when it is displayed on the left. ÷ Returns to [C7]. To continue, place the BKM-14L to the cursor when it is displayed on the right. ÷ Returns to [C721]. [C73] MANUAL menu Adjust the gain of R, G and B with the MANUAL knobs. The signal format and screen size for the adjustment are displayed on the top of the screen. ADJUST... : Adjust the gain. ÷[C731] (It may take some time to change to the next menu.) Use appropriate knobs and buttons in each adjustment as described below. RED: CONTRAST KNOB: Adjust the R gain with the CONTRAST knob. GREEN: BRIGHT KNOB: Adjust the G gain with the BRIGHT knob. BLUE: CHROMA KNOB: Adjust the B gain with the CHROMA knob. CURSOR POSITION: 10KEY: Move the cursor using the numeric keypad (except the 5 button) as illustrated below. Turn on/off the cursor using the 5 button.
SIGNAL: Select the white signal to be used for adjustment. EXT: Use an external input signal. When adjusting the gain, input the appropriate signal. INT: Use an internal white signal. [C71] MANUAL menu Select the rough or fine adjustment of beam landing. First perform the rough adjustment, then proceed to the fine adjustment. DIRECTION : Adjust the beam landing shift approximately by selecting the direction in which the monitor is facing.÷[C711] FINE ADJUST : Adjust the beam landing shift finely at each adjustment point on the screen. ÷[C712] [C711] DIRECTION menu Display the white signal and select the direction using the UP/DOWN buttons or PHASE knob where the white is most uniform on the screen. NORTH, NORTH EAST, EAST, SOUTH EAST, SOUTH, SOUTH WEST, WEST or NORTH WEST [C712] FINE ADJUST menu Display the white signal, select the adjustment point on the screen, and adjust the white at the selected point as uniformly as possible using the UP/DOWN buttons or PHASE knob. NS: Correct the beam landing shift at the top center and bottom center of the screen simultaneously. TOP LEFT: Correct the beam landing shift at the top left of the screen. TOP RIGHT: Correct the beam landing shift at the top right of the screen. BOTTOM LEFT: Correct the beam landing shift at the bottom left of the screen. BOTTOM RIGHT: Correct the beam landing shift at the bottom right of the screen. RESET: Reset the beam landing data at all the five points above to the center simultaneously. When you want to erase characters from the screen while adjusting manually Press the [F1] button. The characters disappear. To display characters, press the [F1] button again. [C72] AUTO menu Before entering the AUTO menu, connect the BKM14L to the OPTION connector. The following message appears.÷[C721] SET PROBE ON CURSOR
The cursor moves in the direction of the arrow corresponding to the pressed button.
1 4 7
2 5 8
3 6 9
Chapter 2 Menu
� The arrow mark (÷) refers you to another setting list that appears after you make the setting, or to an operation that is carried out as a result of the setting. When there is no arrow mark, the menu does not have any sub-list. [C7] WHITE UNIFORMITY menu (1/2) Adjust the shift of beam landing which occurs due to the earth�s magnetism (LANDING ADJUST menu). Select the method of adjustment in this menu. MANUAL... : Adjust with the MANUAL knobs. ÷[C71] AUTO... : Automatically adjust using the Sony BKM14L Auto Setup Probe. ÷[C72] SIGNAL: Select the white signal to be used for adjustment. EXT: Use an external input signal. When adjusting the gain, input the appropriate signal. INT: Use an internal white signal. [C7] WHITE UNIFORMITY menu (2/2) Adjust the color unevenness of the CRT (DIGITAL UNIFORMITY ADJ menu). Select the method of adjustment in this menu. MANUAL... : Adjust with the MANUAL knobs. ÷[C73] AUTO FULL POINTS... : Automatically adjust the whole area of the screen in sequence using the Sony BKM-14L Auto Setup Probe. ÷[C74] AUTO ONE POINT... : Automatically adjust the selected adjustment point of the screen only using the Sony BKM-14L Auto Setup Probe. ÷[C75] ORIGINAL VALUE: Set the initial value. Select the signal format from 1035/60I, 1080/60I, 1080/50I, 1080/48I, 480/60P, 480/60I, 575/50P, 570/50I and 720/60P, and the screen size from 16:9-NORM, 16:9-UNDR, 4:3-NORM and 4:3UNDR.
Note
CURSOR H SIZE: Specify the horizontal size of the cursor (1 to 4). CURSOR V SIZE: Specify the vertical size of the cursor (1 to 4). [C731] ADJUST menu Adjust the gain at the cursor position using the CONTRAST (RED), BRIGHT (GREEN) and CHROMA (BLUE) knobs. Move the cursor using the numeric keypad. To reset RED/GREEN/BLUE to the value before adjustment When you are adjusting the gain using the MANUAL adjustment knobs, you can reset the setting to the one before adjustment by pressing the corresponding MANUAL button. To cancel the adjustment Press the MENU button. The adjusted data is cleared and the screen returns to [C73]. (It may take some time to change to the previous menu.) When you want to erase characters from the screen while adjusting manually Press the [F1] button. The characters disappear. To display characters, press the [F1] button again. [C74] AUTO FULL POINTS menu Before entering the AUTO FULL POINTS menu, connect the BKM-14L to the OPTION connector. The following message appears.÷[C741] (It may take some time to change to the next menu.) SET PROBE ON CURSOR [C741] SET PROBE ON CURSOR To perform adjustment, operate the BKM-14L as follows: (1) Place the BKM-14L to the cursor displayed in the center of the screen. ÷ The adjustment starts. When the adjustment is completed, the cursor is displayed at the next adjustment point. (2) Move the BKM-14L to the cursor. ÷ The next adjustment is performed.
(continued)
4:3-NORM and 4:3-UNDR can be combined with 480/60P, 480/60I, 575/50P and 570/50I only.
52
53
|
|
|
> |
|