|
Dla tego produktu nie napisano jeszcze recenzji!
 ;
jedyne do czego mogę mieć zastrzeżenie to jakość zdjęć zawartych w przesłanej instrukcji serwisowej ponieważ są fatalnej jakości, praktycznie nieczytelne. tak poza tym jestem zadowolony to jest to czego szukałem.
 ;
Wszystko w porządku.
Instrukcja czytelna i kompletna.
Dziękuję.
all right!
thank you.
;
Bardzo dobra instrukcja. Zawiera wszystko co potrzeba, polecam!
;
Instrukcja jest OK. Schematy czytelne, opisane niektóre procedury.
;
Instrukcja bardzo czytelna. zawiera co potrzeba. Polecam
CDP-CX355
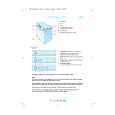
3-8. D. SW Board
7 holder (L-SW) 1 washer 6 two claws 2 gear (door.cam) 5 two screws (+BTP 2.6 x 6) 8 D. SW board 3 washer 4 gear (door.drive)
Precaution during the gear (door.cam) installation
1 Move the slider (pop-up) and the lever (cam.pu) fully in the direction of the arrow A. 2 Install the gear (door.cam) in the direction shown in the illustration and rotate it fully in the direction of the arrow B.
B
A
slider (pop-up)
lever (cam.pu)
gear (door.cam)
The levers of the two rotary switches on the D. SW board are shown in the illustration below. two rotary switches D. SW board
3 When the gear (door.cam) happens to go too deep, return it to the original position in the direction of the arrow C.
C
12
|