Nie masz w koszyku żadnych produktów
 
English Polski Spanish 
Szukaj instrukcji do
 

(e.g. AA-V20EG JVC, ZX-7 Sony )
PayPal 1000+ rating Secure, Encrypted Checkout.
 
Kto jest w sklepie?
Sklep przegląda 6043 gości 
Kategorie
Informacje
Polecamy
Strona główna >> HITACHI >> CMPAT04 Instrukcja Obsługi
 
 0 szt. w koszyku 

HITACHI CMPAT04
Instrukcja Obsługi


Tweetnij o tym produkcie a dostaniesz $1.00 rabatu!
  • Plik do pobrania
  • Format PDF
  • Kompletna instrukcja
  • Język: English
Cena: $4.99

Opis HITACHI CMPAT04 Instrukcja Obsługi

Kompletna instrukcja obsługi w formie pliku PDF. Plik PDF zostanie dostarczony na Twój adres email po jego zakupieniu.

Instrukcje obsługi (czasami nazywane także podręcznikiem użytkownika) opisuja funkcje i sposób działania danego produktu.

Instrukcja jest dostępna w następujących językach: English

Plik nie jest jeszcze gotowy
Musisz najpierw dokonać zakupu.

Recenzje produktu
Dla tego produktu nie napisano jeszcze recenzji!

Tekstowy podgląd strony 7 (kliknij aby zobaczyć)
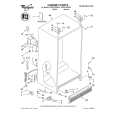
4. Installing the angle adjustment unit
1. Pass the wiring cables through the pipe, then insert the angle adjustment unit into the ceiling mount unit. Adjust the height so that the red mark on the pipe is not visible and then insert the two coupling pins. Have two coupling pins inserted into the linkage holes in the angle adjustment unit. 2. Insert snap pins into the holes in the ends of the coupling pins. 3. Tighten the 4 lock screws. 4. Adjust the horizontal angle of the screen. 5. Tighten the one rotation stopper screw. Red mark
2.Insert 2 snap pins. Ceiling mount unit

3.Tighten the 4 lock screws.

1.Insert the 2 coupling pins

Linkage hole

5.Tighten the rotation stopper screw.

Angle adjustment unit

This could cause the plasma display to fall if it is assembled to make the red mark visible.

4.Adjust the horizontal angle.

Mounting the display mounting fittings on the plasma display
CMP401X
1. Remove the stand. 1. Place a protective sheet cover on the top of a table and place the plasma display on the cover with the back side upward. 2. Remove the screws fastening the column and pull the column out in the direction indicated by the arrow mark. 3. Remove the 4 screws fastening the stand and remove the stand in the direction indicated by the arrow mark.

Remove 4 screws. Column Stand Remove the screws. CMP401X plasma display Stand

Table

-7-

Klienci kupując ten produkt kupili także

$4.99

SX-K700 TECHNICS
Instrukcja Obsługi

Kompletna instrukcja obsługi w formie pliku PDF. Plik PDF zostanie dostarczony na Twój adres email…

$4.99

CJ-V51 PIONEER
Instrukcja Serwisowa

Kompletna instrukcja serwisowa w formie pliku PDF. Instrukcje serwisowe zazwyczaj zawierają schemat…

$4.99

GRAND PRIX ELECTRONIC 754 BECKER
Instrukcja Serwisowa

Kompletna instrukcja serwisowa w formie pliku PDF. Instrukcje serwisowe zazwyczaj zawierają schemat…

$4.99

SX-PR602 TECHNICS
Instrukcja Serwisowa

Kompletna instrukcja serwisowa w formie pliku PDF. Instrukcje serwisowe zazwyczaj zawierają schemat…

$4.99

EV-S1000E SONY
Instrukcja Obsługi

Kompletna instrukcja obsługi w formie pliku PDF. Plik PDF zostanie dostarczony na Twój adres email…

$4.99

GRAND PRIX ELECTRONIC 780 BECKER
Instrukcja Serwisowa

Kompletna instrukcja serwisowa w formie pliku PDF. Instrukcje serwisowe zazwyczaj zawierają schemat…

$4.99

AG7330 PANASONIC
Instrukcja Serwisowa

Kompletna instrukcja serwisowa w formie pliku PDF. Instrukcje serwisowe zazwyczaj zawierają schemat…

$4.99

EVO-9850 VOLUME 1 SONY
Instrukcja Serwisowa

Kompletna instrukcja serwisowa w formie pliku PDF. Instrukcje serwisowe zazwyczaj zawierają schemat…
>
Parse Time: 0.199 - Number of Queries: 132 - Query Time: 0.055