|
|
|
Kategorie
|
|
Informacje
|
|
Polecamy
|
|
|
 |
|
|
Dla tego produktu nie napisano jeszcze recenzji!
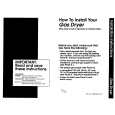
Basic Connections (continued)
Clean Cloth
A A
B
C
IR
STANDBY/P LAY
C
To lock stand, slide to left
B
Step 2: Placing the unit
Before you start.... � Make sure that all cables have been connected to this unit. � To prevent this unit from being scratched, always covers its front surface with a cloth before you place it flat on any surface. Option 1: Placing on the table top
Option 2: Mounting on the wall CAUTION! Risk of personal injury and damage to the unit. Allow only qualified persons to mount the unit. Note: Mounting accessories not supplied.
A Mark the wall for screw hole positions
where you intend to mount this unit, then drill the screw holes.
A Place this unit on a flat surface with the
front panel facing down.
B Insert the rubber wall plugs and screws
into the holes.
B Place the detachable stand on the rear
panel.
C Hook this unit firmly onto the screws
and lock into position. Helpful Hint: � To remove the stand, press and hold the catch at the extreme right of the rear panel and push the panel towards the right.
C Slide the stand to the left to lock it into
position.
15
1_dvp6620_55_eng7_Final2.indd 15 2007-08-15 3:58:42 PM
English
|
|
|
> |
|