|
|
|
Kategorie
|
|
Informacje
|
|
Polecamy
|
|
|
 |
|
|
Dla tego produktu nie napisano jeszcze recenzji!
5. OUVRIR le robinet d�arrêt. Inspecter pour rechercher les fuites. Serrer tous les raccords (y compris les raccordements de la valve d�entrée d�eau) ou les écrous qui coulent. 6. La machine à glaçons est équipée d�un filtre à eau incorporé. Si la qualité de l�eau distribuée localement nécessite un deuxième filtre à eau, il serait utile de l'installer dans le tube de raccordement de ¹��" (6,35 mm) sur l'un ou l'autre des raccords du tuyau. On peut obtenir un tel filtre à eau chez le marchand d�appareils électroménagers le plus proche.
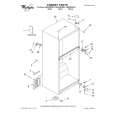
Démontage - Portes et charnières
Vis de charnière à tête hexagonale de ����"
1. Débrancher le réfrigérateur ou déconnecter la source de courant électrique. 2. Fermer la porte du réfrigérateur; maintenir les deux portes fermées jusqu�au moment où on est prêt à les séparer de la caisse de l�appareil. REMARQUE : Prévoir un support additionnel des portes pendant le démontage des charnières. La force d�attraction des aimants des portes ne suffit pas à les maintenir en place. 3. Enlever les pièces de la charnière supérieure - voir l�illustration de la charnière supérieure. Soulever la porte du compartiment de congélation pour la séparer de la caisse. 4. Enlever les pièces de la charnière centrale - voir l�illustration de la charnière centrale. Soulever la porte du réfrigérateur pour la séparer de la caisse. 5. Enlever les pièces de la charnière inférieure - voir l�illustration de la charnière inférieure.
Achever l�installation
AVERTISSEMENT
Risque de choc électrique Brancher sur une prise à 3 alvéoles reliée à la terre. Ne pas enlever la broche de liaison à la terre. Ne pas utiliser un adaptateur. Ne pas utiliser un câble de rallonge. Le non-respect de ces instructions peut causer un décès, un incendie ou un choc électrique.
Brancher sur une prise à 3 alvéoles reliée à la terre. REMARQUE : Attendre 24 heures pour produire la première quantité de glaçons. Jeter les trois premières quantités de glaçons produites. Attendre 3 jours pour que le bac à glaçons se remplisse entièrement.
Inversion des portes (facultatif)
IMPORTANT : Si on souhaite inverser la position des portes pour pouvoir les ouvrir dans la direction opposée, procéder comme suit. S�il n�est pas nécessaire de changer l�orientation des portes, voir �Réinstallation - Portes et charnières� plus loin dans cette section.
Style 1 - Standard
Les illustrations suivent ces instructions.
Portes du réfrigérateur
OUTILLAGE N�CESSAIRE : Clé à douille avec douille hexagonale de ����", tournevis Phillips n° 2, tournevis à lame plate, clé plate de ����", couteau à mastic plat de 2". IMPORTANT : s Avant de commencer, tourner la commande du réfrigérateur à OFF (arrêt). Débrancher le réfrigérateur ou déconnecter la source de courant électrique.
s
Vis de butée de la porte
Bouchon d'obturation de charnière de porte
Vis de scellement de la poignée de la porte
Bouchon d'obturation de charnière de caisse
Vis de la poignée à tête plate
Retirer les aliments et tout balconnet ou casier utilitaire de la porte du réfrigérateur. Si vous désirez seulement enlever et réinstaller les portes, voir �Démontage - Portes et charnières� et �Réinstallation Portes et charnières�. Selon votre modèle, vous pouvez avoir des portes standard (Style 1) ou contour (Style 2). Si on prévoit également d'inverser le sens d�ouverture des portes, suivre les instructions pour le style de porte approprié.
Vis frontale de scellement de la poignée de la porte
Couvre-vis de la poignée de la porte
s
Vis de poignée à tête ronde
s
Caisse 1. Enlever les vis à tête hexagonale de ����" de la charnière (côté poignée); transférer ces pièces du côté opposé. Voir l�illustration 1-1. 2. Enlever les bouchons obturateurs des trous au sommet de la caisse; transférer ceux-ci dans les trous de charnière du côté opposé. Voir l�illustration 1-2.
42
|
|
|
> |
|