|
|
|
Kategorie
|
|
Informacje
|
|
Polecamy
|
|
|
 |
|
|
Dla tego produktu nie napisano jeszcze recenzji!
 ;
Dokładna dokumentacja, pomogła w szybkiej naprawie telewizora. Dziękuję!
 ;
jedyne do czego mogę mieć zastrzeżenie to jakość zdjęć zawartych w przesłanej instrukcji serwisowej ponieważ są fatalnej jakości, praktycznie nieczytelne. tak poza tym jestem zadowolony to jest to czego szukałem.
;
Wszystko w porządku.
Instrukcja czytelna i kompletna.
Dziękuję.
all right!
thank you.
;
Bardzo dobra instrukcja. Zawiera wszystko co potrzeba, polecam!
;
Instrukcja jest OK. Schematy czytelne, opisane niektóre procedury.
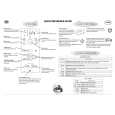
RECORDING
Make sure ... � The unit is turned on. � Insert a cassette tape with its erase prevention tab in place. (If necessary, rewind or fast forward the tape to the point at which you want to begin recording.) NOTES: � This unit will ONLY record and view the same channel. � This unit cannot record the contents from the built-in DVD.
NORMAL RECORDING
TV/VCR
You can ONLY watch the same TV program that is being recorded.
SKIPPING UNWANTED SCENES DURING RECORDING
TV/VCR
Press the PAUSE button to temporarily stop recording. Press the PAUSE or RECORD button to resume recording. NOTES: � After 5 minutes, the unit will automatically switch to Recording mode to prevent tape damage. � If �CLOSED CAPTION (ON)� is selected, the OnScreen Display will appear for 5 seconds, then disappear.
SP PAUSE
1
Select the channel to be recorded
Press the number buttons on the CH 10 remote control or the CHANNEL button K or L. Remember: If the unit is connected to a cable box or satellite box, the unit must be on CH3 or CH4, then the channel to be recorded must be selected on the cable box or satellite box.
2
Select the tape speed
Press the SPEED button to select the desired tape speed (SP/ SLP).
SP
3
Begin recording
REC
Press the RECORD button.
SP
4
Stop recording
Press the STOP button when recording is completed.
- 30 -
EN
1C29
|
|
|
> |
|