|
|
|
Kategorie
|
|
Informacje
|
|
Polecamy
|
|
|
 |
|
|
Dla tego produktu nie napisano jeszcze recenzji!
 ;
Wszystko w porządku.
Instrukcja czytelna i kompletna.
Dziękuję.
all right!
thank you.
;
Bardzo dobra instrukcja. Zawiera wszystko co potrzeba, polecam!
 ;
Instrukcja jest OK. Schematy czytelne, opisane niektóre procedury.
;
Instrukcja bardzo czytelna. zawiera co potrzeba. Polecam
;
...instrukcja serwisowa w pełni czytelna i kompletna. Dziękuję!
KD-SH707R
3. Remove the three screws B on both sides of the body. 4. Remove the screw C and the three screws D on the left side of the body. 5. Remove the two screws E and the screw F on the back of the body. 6. Move the top chassis upward and remove it with the CD mechanism assembly. The connector on the CD mechanism assembly is disconnected connector CN601 on the main board. from
Top chassis
B
Fig.4
B
C
Top chassis
Heat sink
D
Fig.5
B
E
F
Fig.6
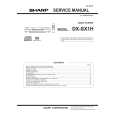
Removing the (A) board (See Fig.7)
Prior to performing the following procedure, remove the top cover. 1. Disconnect the wire from connector CN601 on the (A) board. 2. Remove the five screws G and the (A) board, releasing the joint a and b.
G
CN601
a
b
G
Fig.7 1-5
|
|
|
> |
|