|
Dla tego produktu nie napisano jeszcze recenzji!
 ;
Bardzo dobra jakość skanu, przystępna cena. Instrukcja serwisowa okazała się przydatna przy "reanimowaniu" dwudziestoparoletniego decka, który teraz pięknie gra :)
;
...instruction is ok.
...instrukcja jest ok.
Thanks/Dzięki
;
Documentation made available quickly and It is good quality. Thanks.
SECTION 2 DISASSEMBLY
� The equipment can be removed using the following procedure.
Set
Lid assy, cassette Lid, battery case
Cabinet (rear) assy
Main board
Mechanism deck
Head, ceramic (HRPE901) LED unit
Note : Follow the disassembly procedure in the numerical order given.
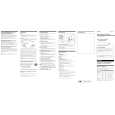
2-1. LID ASSY, CASSETTE
top view
3
cabinet (front)
4
precision screwdriver or equivalent
2 Stop the lid assy, cassette halfway.
lid assy, cassette
precision screwdriver or equivalent
1
Note : When removing the cassette lid, put cloth on the end of a screwdriver or use a polyacetal driver to avoid damage to the cabinet.
9 lid assy, cassette
5 7 6 8
�4�
|