|
Dla tego produktu nie napisano jeszcze recenzji!
 ;
Bardzo dobra jakość skanu, przystępna cena. Instrukcja serwisowa okazała się przydatna przy "reanimowaniu" dwudziestoparoletniego decka, który teraz pięknie gra :)
;
...instruction is ok.
...instrukcja jest ok.
Thanks/Dzięki
;
Documentation made available quickly and It is good quality. Thanks.
MX-K3
Removing the front panel assembly (See Fig.11 and 12)
Prior to performing the following procedures, remove the top cover. Also remove the CD changer unit. 1. Disconnect the parallel wire and card wire from the connectors CN1101,CN901,CN901A and CN901B on the power amp and supply PCB. 2. Remove the two screws "G" retaining the front panel assembly onto the bottom of the body. 3. Remove the screw "H" retaining the cassette deck mechanism and then remove the GND lug "b" that comes from the power amp and supply PCB. 4. Disengage the claws "c" on both sides at the bottom of the front panel assembly and then remove the assembly.
G
Fig.11
Power amp and supply PCB
Claw c
GND lug b
H
Fig.12
1-9
 $4.99 MX-K3 JVC
Schematy Zestaw schematów dla tego urządzenia. Plik PDF zawierający schematy będzie dostarczony na Twó… 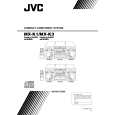 $4.99 MXK3 JVC
Instrukcja Obsługi Kompletna instrukcja obsługi w formie pliku PDF. Plik PDF zostanie dostarczony na Twój adres email…  $4.99 MX-K3 JVC
Katalog Części Katalog części w formie pliku PDF. Plik zawiera wykaz części znajdujących się w urządzeniu wr…
|