|
Dla tego produktu nie napisano jeszcze recenzji!
 ;
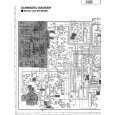
jedyne do czego mogę mieć zastrzeżenie to jakość zdjęć zawartych w przesłanej instrukcji serwisowej ponieważ są fatalnej jakości, praktycznie nieczytelne. tak poza tym jestem zadowolony to jest to czego szukałem.
 ;
Wszystko w porządku.
Instrukcja czytelna i kompletna.
Dziękuję.
all right!
thank you.
;
Bardzo dobra instrukcja. Zawiera wszystko co potrzeba, polecam!
;
Instrukcja jest OK. Schematy czytelne, opisane niektóre procedury.
;
Instrukcja bardzo czytelna. zawiera co potrzeba. Polecam
CHAPTER 2 STANDARDS AND ADJUSTMENTS
4) Lead the shorter end [6] under the No. 1 mirror mount [8] and the No. 2/3 mirror mount [9]; then, hook it on the left rear pulley [10] and the pulley [11] of the No. 2/3 mirror mount.
[11] [9] [8] [10]
[6]
Figure 2-20 5) After fitting the shorter end [6] on the cable hook [12], secure its end with adhesive tape [13]. Be sure that the secured end of the cable is found where the hole in the left side plate and the tip of the cable matches.
[13] [6] [12]
Figure 2-21
2-13
|