|
|
|
Kategorie
|
|
Informacje
|
|
Polecamy
|
|
|
 |
|
|
Dla tego produktu nie napisano jeszcze recenzji!
 ;
Dokładna dokumentacja, pomogła w szybkiej naprawie telewizora. Dziękuję!
 ;
jedyne do czego mogę mieć zastrzeżenie to jakość zdjęć zawartych w przesłanej instrukcji serwisowej ponieważ są fatalnej jakości, praktycznie nieczytelne. tak poza tym jestem zadowolony to jest to czego szukałem.
;
Wszystko w porządku.
Instrukcja czytelna i kompletna.
Dziękuję.
all right!
thank you.
;
Bardzo dobra instrukcja. Zawiera wszystko co potrzeba, polecam!
;
Instrukcja jest OK. Schematy czytelne, opisane niektóre procedury.
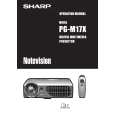
PG-M17X
Lamp
The lamp in this projector operates for approximately 1,500 cumulative hours, depending on the usage environment. It is recommended that the lamp be replaced after 1,400 cumulative hours of use or when you notice a significant deterioration of the picture and color quality. The lamp usage time can be checked with the On-screen Display.
CAUTION Intense light hazard. Do not attempt to look into the apertur e and lens while the projector is operating.
As the usage environment can vary significantl y, the projector lamp may not operate for 1,500 hours. 1,500 hours above indicates average life span and should be used for r eference only. This is different than the warranty period. For safety, the power will not be turned on from the fourth time when turning on the power without changing the lamp after use for 1,500 hours.
Condition The LAMP REPLACEMENT indicator illuminates red, and LAMP will appear in yellow in the lower-left corner of the picture. A significant deterioration of the pictur e and color quality occurs. The power will automatically turn off and the projector will enter standby mode. LAMP will appear in r ed in the lower-left corner of the pictur e, and the power will turn off.
Problem Lamp has been used for over 1,400 hours.
Possible Solution Purchase a replacement lamp unit (lamp cage/module) of the curr ent type BQCPGM17X//1 from your nearest Sharp Authorized Projector Dealer or Service Center. Replace the lamp. If you wish, you may have the lamp replaced at your near est Sharp Authorized Projector Dealer or Service Center.
Lamp has been used for over 1,500 hours.
1
Turn off the power.
2
Disconnect the power cord.
3
Remove the lamp cage cover.
Press ON/OFF on the projector or POWER on the remote control. Wait until the cooling fan stops.
Unplug the power cord from the AC socket.
Turn over the projector and loosen the user service screws that secure the lamp cage cover. Then lift open the cover in the direction of the arrow.
or
4
Remove the lamp cage.
5
Insert the new lamp cage.
6
Attach the lamp cage cover.
Loosen the securing screws on the lamp cage. Hold the lamp cage by the handle and pull it towards you.
Press the lamp cage firmly into the lamp cage compartment. Fasten the securing screws.
Slide the lamp cage cover in the direction of the arrow. Then tighten the user service screws.
21
|
|
|
> |
|