|
Dla tego produktu nie napisano jeszcze recenzji!
 ;
Schematy są ale można wysilić się i zrobić kolorowy skan i o większej rozdzielczości. Wtedy schematy płytek będą czytelniejsze. Całość super jako wartość merytoryczna. Wszystkie dane potrzebne do podłączenia różnego rodzajów urządzeń takich gramofon, CD itd.
 ;
Szybko, sprawnie i tanio. Serwis godny polecenia. Będę polecał innym
;
Ogólnie jest OK, z wyjątkiem obrazu płyty głównej, który jest miejscami mało czytelny, ale można sobie poradzić.
;
Dokładna dokumentacja, pomogła w szybkiej naprawie telewizora. Dziękuję!
;
jedyne do czego mogę mieć zastrzeżenie to jakość zdjęć zawartych w przesłanej instrukcji serwisowej ponieważ są fatalnej jakości, praktycznie nieczytelne. tak poza tym jestem zadowolony to jest to czego szukałem.
5
6
7
8
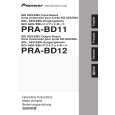
INSTALLATION
A
1. Remove the PRV-LX1 top panel. � Remove the seven screws in the top panel and the top panel (these screws will be used to reinstall the top panel in Step 14).
Top panel
B
2. Remove the rear panel blind plate. � To prevent the blind plate from dropping, hold it in place while removing the two black installation screws (these screws will be used to reinstall the terminal cover in Step 12). Blind plate Remove the blind plate on the left (as seen from the rear) to install the PRA-BD11 input board. Note: Make sure that the removed screws are not mixed up with the screws supplied with this unit.
C
Remove the blind plate on the right (as seen from the rear) to install the PRA-BD12 output board.
3. Remove the rear bridge. � Remove the four installation screws and the rear bridge (these screws will be used to reinstall the bridge in Step 9). Rear bridge Note: Make sure that the removed screws are not mixed up with the screws supplied with this unit.
D
E
F
PRA-BD11
5 6 7 8
61
|