|
Dla tego produktu nie napisano jeszcze recenzji!
 ;
Bardzo dobra jakość skanu, przystępna cena. Instrukcja serwisowa okazała się przydatna przy "reanimowaniu" dwudziestoparoletniego decka, który teraz pięknie gra :)
;
...instruction is ok.
...instrukcja jest ok.
Thanks/Dzięki
;
Documentation made available quickly and It is good quality. Thanks.
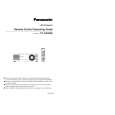
PT-AE900U / PT-AE900E
6.10. Removal of Analysis Block
1. Remove the lamp unit according to the section 6.9. "Removal of Lamp Unit". 2. Remove the A-P.C.Board block according to the steps 1 through 3 in the section 6.3. "Removal of A-P.C.Board". 3. Unscrew the 2 screws and remove the lamp unit terminal. 4. Unscrew the 1 screw and remove the thermofuse attachment. 5. Unscrew the 3 screws and remove the lamphouse.
9. Unscrew the 3 screws and remove the LCD duct.
6. Unscrew the 3 screws and remove the block of Analysis Block, LCD Block and Projection Lens Block.
6.11. Removal of LCD Block
1. Remove the A-P.C.Board block according to the steps 1 through 3 in the section 6.3. "Removal of A-P.C.Board". 2. Unscrew the 2 screws and remove the LCD block.
7. Unscrew the 2 screws and remove the LCD block. 8. Unscrew the 4 screws and remove the projection lens block (with shift mechanism).
6.12. Removal of Projection Lens
1. Remove the projection lens block according to the steps 1 through 8 in the section 6.10. "Removal of Analysis Block ". 2. Unscrew the 4 screws and separate the projection lens and the shift mechanism.
18
|