|
|
|
Kategorie
|
|
Informacje
|
|
Polecamy
|
|
|
 |
|
|
Dla tego produktu nie napisano jeszcze recenzji!
 ;
Dokładna dokumentacja, pomogła w szybkiej naprawie telewizora. Dziękuję!
 ;
jedyne do czego mogę mieć zastrzeżenie to jakość zdjęć zawartych w przesłanej instrukcji serwisowej ponieważ są fatalnej jakości, praktycznie nieczytelne. tak poza tym jestem zadowolony to jest to czego szukałem.
;
Wszystko w porządku.
Instrukcja czytelna i kompletna.
Dziękuję.
all right!
thank you.
;
Bardzo dobra instrukcja. Zawiera wszystko co potrzeba, polecam!
;
Instrukcja jest OK. Schematy czytelne, opisane niektóre procedury.
VCC3, VCC5 voltage check PCB-LA � Voltage supply CP151 = 5.0 ± 0.05 V. (You can use an AC adaptor however, for the checking after repairs, apply above mentioned voltages.) (1) Apply 5.0 ± 0.05 V to CP150. (2) Make sure VCC3 (CP160) is 3.3 ± 0.1 V and VCC5 (CP152) is 5.0 ± 0.15 V.
VCC2 adjustment and VCC7, VCC8, VEE2 voltage check � Voltage supply VCL0(CP101)=5.0±0.05V. (You can use an AC adaptor however, for the checking after repairs, apply above mentioned voltages.) (1) Apply 5.0 V ± 0.05 V to VCL0 and adjust VR100 so that VCC2 will be 5.0 ± 0.02 V. Notes: � VCC7 = 7.3 ~ 8.3 [V], VCC8 = 12.0 ~ 14.0 [V] � VEE2 = �12.3 ~ �16.7 [V] In addition, disconnect the power and make sure all output voltages are 0 V.
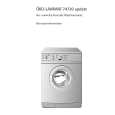
VCO free run frequency adjustment � Voltage supply VCC2=5 V ± 0.05 (V) (CP181). VCC8 = 13.5 ± 0.05 (V) (CP180). VEE2 = �15.0 ± 0.05 (V) (CP182). Connect CP705 (CSY) and CP700 (GNP). (You can use an AC adaptor however, for the checking after repairs, apply above mentioned voltages.) (1) Monitoring CP710 (HDB) with a frequency counter, adjust VR720 so that the frequency will be 15.734 ± 0.1 [KHz]. Notes: � Disconnect CP705 and CP700, then connect PCB-LA and make sure CP705 (CSY) and CP710 (HDB) are synchronized. � Keep room temperature at 20 ± 10°C. QV-770
PCB-LB
VCC2 Power suppry VCC8 VEE2 (CP181) (CP180) (CP182) CSY (CP705) PCB-LA PCB assy CS (CP705) HDB (CP710) frequency counter CSY oscilloscope HDB
� 17 �
|
|
|
> |
|