|
|
|
Kategorie
|
|
Informacje
|
|
Polecamy
|
|
|
 |
|
|
Dla tego produktu nie napisano jeszcze recenzji!
 ;
Dobrej jakości skan - wkońcu mogłem poznać wszystkie funkcje tego odtwarzacza - polecam .
;
Gruba instrukcja - poprostu wszystko co potrzreba - polecam .
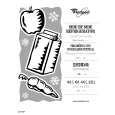
DESCRIPTION FRONT PANEL
PAN
OUT OUT OUT OUT OUT OUT STEREO INPUT PWR
CONNECTION Connect the AC cord to a properly grounded ac outlet.
HEADPHONE AMPLIFIER
RA62
VOLUME
VOLUME
VOLUME
VOLUME
VOLUME
VOLUME
MONO STEREO
Determine which input configuration you will use; either discreet right/left, TRS stereo, or mono. For a discreet right/left input configuration, connect a 1/4� TS plug containing the �Right� portion of the stereo signal to the Right Main Input. Connect a 1/4� TS plug containing the �Left� portion of the stereo signal to the Left Input. For a TRS stereo input configuration, connect a Tip-Ring-Sleeve stereo plug into the front panel STEREO IN input. This cable may come from a mixer�s headphone output for example. To send a mono signal to the RA62, connect a 1/4� Tip-Sleeve plug into either the Right or Left input and press in the front panel MONO/STEREO switch. This mono signal will be fed to both the right and left sides of the headphone outputs. The Aux Inputs are connected in the same manner as the discreet right/left input configuration listed above.
Note: Descriptions for Channel One through Channel Six are identical. OUT 1 - 6 : 1/4� Tip-Ring-Sleeve jack for connection to a standard pair of headphones. VOLUME 1 - 6: Controls the amount of output signal from the indicated channel.
MONO/STEREO SWITCH: When this switch is pressed in, the Right and Left channels are summed together providing a mono output signal. PAN: Controls the relative amount of signal sent to the Right and Left output channels. STEREO IN: 1/4� TRS input jack which paralells the rear panel Right and Left input jacks. POWER LED: Indicates that the RA62 is connected to the power supply and is on.
REAR PANEL
62120 VAC 50/60 Hz 15 VA
MAIN INPUT
SERIAL NUMBER MODEL RA62
AUX INPUT INSERT 6 INSERT 5 INSERT 4 INSERT 3 INSERT 2 INSERT 1
LEFT RIGHT
CAUTION
RISK OF ELECTRIC SHOCK DO NOT OPEN
RIGHT
LEFT
INSERTS The inserts have been provided so you can directly access each headphone
NRTL /C
MADE IN U.S.A.
DO NOT EXPOSE THIS EQUIPMENT TO RAIN OR MOISTURE. TO REDUCE THE RISK OF ELECTRIC SHOCK DO NOT NOT REMOVE BACK. NO USER SERVICABLE PARTS INSIDE. REFER SERVICING TO QUALIFIED SERVICE PERSONNEL
WARNING:
RISQUE DE CHOC - NE PAS ENLEVER
output with its own program material. The inserts require Tip-Ring-Sleeve connectors, with right and left signals on the tip and ring respectively. If you use a TS mono plug - you will only hear sound out of one side. When these insert jacks are used, the main Right/Stereo and Left/Mono, as well as the Aux Inputs - are disconnected. Only the stereo signals sent to the Insert jacks go to that corresponding output.
120 VAC INPUT: Connects to a properly grounded AC outlet. MAIN INPUT: 1/4� TRS jacks for connecting to the desired Right and Left program material. AUX INPUT: Additional 1/4� unbalanced inputs - for use in the event
Note: The description for the Channel Inserts pertains to all six channels. CHANNEL INSERTS:
CAUTION: Plugging a mono 1/4� TS plug into the Headphone Outputs may cause permanent damage to the unit because one side would be shorted to ground. Never plug a mono plug into any of the Headphone Outputs.
Tip Ring Sleeve (ground)
3 4
|
|
|
> |
|