|
|
|
Kategorie
|
|
Informacje
|
|
Polecamy
|
|
|
 |
|
|
Dla tego produktu nie napisano jeszcze recenzji!
 ;
Dokładna dokumentacja, pomogła w szybkiej naprawie telewizora. Dziękuję!
 ;
jedyne do czego mogę mieć zastrzeżenie to jakość zdjęć zawartych w przesłanej instrukcji serwisowej ponieważ są fatalnej jakości, praktycznie nieczytelne. tak poza tym jestem zadowolony to jest to czego szukałem.
;
Wszystko w porządku.
Instrukcja czytelna i kompletna.
Dziękuję.
all right!
thank you.
;
Bardzo dobra instrukcja. Zawiera wszystko co potrzeba, polecam!
;
Instrukcja jest OK. Schematy czytelne, opisane niektóre procedury.
1-3
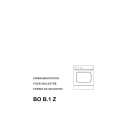
MECHANICAL INSTRUCTIONS - TS9500
Set Reassembly
1. Put Toppart (*item1) and IR-wind assy (*item 4) together. 2. Place Toppart assy (item1 & item4) upside down. 3. Place LCD assy. (*item15) 4. Place action keys assy . (*item8) 5. Place lower keymat assy. (*item 9)
1+4
8 15
1
17
6. Place LCD support plate (*item17)
9 9
B
7. Place printboard assy. (*item1001) 8. Place Doc. plug assy. (*item7) 9 Connect the two flex cable to the connectors and close the cable locks. see arrows A 10. Mount the 5 screws back. see arrows
A 7
7
11. Place the bottom part (*item 2) 12. Mount the 2 screws 13. Place batterypack 14. Place batterylid assy. (*item3)
* for items see overview disassembled parts
|
|
|
> |
|