|
Dla tego produktu nie napisano jeszcze recenzji!
 ;
Wszystko w porządku.
Instrukcja czytelna i kompletna.
Dziękuję.
all right!
thank you.
;
Bardzo dobra instrukcja. Zawiera wszystko co potrzeba, polecam!
 ;
Instrukcja jest OK. Schematy czytelne, opisane niektóre procedury.
;
Instrukcja bardzo czytelna. zawiera co potrzeba. Polecam
;
...instrukcja serwisowa w pełni czytelna i kompletna. Dziękuję!
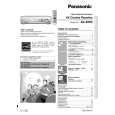
SA-XR55P / SA-XR55PC
Step 3: Remove the rear panel as arrows shown.
7.11. Disassembly and Checking of Input P.C.B.
· Follow the (Step 1) - (Step 4) of item 7.3. · Follow the (Step 1) of item 7.6. · Follow the (Step 1) of item 7.7. · Follow the (Step 1) of item 7.8. · Follow the (Step 1) of item 7.9. · Follow the (Step 1) - (Step 3) of item 7.10.
Step 1: Remove 11 screws.
Step 2: Be careful of the both side catches when remove the rear panel.
Step 1: Remove 2 screws. Step 2: Flip over the Input P.C.B. as arrow shown .
23
|