|
|
|
Kategorie
|
|
Informacje
|
|
Polecamy
|
|
|
 |
|
|
Dla tego produktu nie napisano jeszcze recenzji!
 ;
jedyne do czego mogę mieć zastrzeżenie to jakość zdjęć zawartych w przesłanej instrukcji serwisowej ponieważ są fatalnej jakości, praktycznie nieczytelne. tak poza tym jestem zadowolony to jest to czego szukałem.
 ;
Wszystko w porządku.
Instrukcja czytelna i kompletna.
Dziękuję.
all right!
thank you.
;
Bardzo dobra instrukcja. Zawiera wszystko co potrzeba, polecam!
;
Instrukcja jest OK. Schematy czytelne, opisane niektóre procedury.
;
Instrukcja bardzo czytelna. zawiera co potrzeba. Polecam
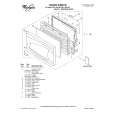
1-4. Tray Replacement
Note: � Perform this service only when a defective with a disc not ejected, etc. occurs. 1-4-1. Tray Removal 1. Remove the mechanism chassis assembly. (Refer to item 1-3-1.) 2. Turn the gear (2) clockwise to eject the tray (1). 3. Pull out the tray (1) to this side until it stops. 4. Release the claws on the right side of the mechanism chassis assembly (part A) and pull out the tray (1) with it obliquely lifted up.
<The First Tray
Removal>
1. Slide the tray marked in the arrow direction, then remove it from two bosses.
First tray 1 Bosses Upper Wing
1
Label of first tray 1
Lower Wing (for second tray)
Claws
Removed tray
Fig. 2-1-23
Gear (2)
Tray (1)
<The Second Tray 2 Removal> 1. Turning the gear counterclockwise ascends the tray. Pull out the second tray marked 2 .
A Tray (1)
Second tray 2 Gear
Mechanism chassis assembly
Fig. 2-1-22
Turn it counterclockwise
Fig. 2-1-24
|
|
|
> |
|