Nie masz w koszyku żadnych produktów
 
English Polski Spanish 
Szukaj instrukcji do
 

(e.g. AA-V20EG JVC, ZX-7 Sony )
PayPal 1000+ rating Secure, Encrypted Checkout.
 
Kto jest w sklepie?
Sklep przegląda 6043 gości 
Kategorie
Informacje
Polecamy
Strona główna >> SHARP >> SJ-68L-T2G Instrukcja Serwisowa
 
 0 szt. w koszyku 

SHARP SJ-68L-T2G
Instrukcja Serwisowa


Tweetnij o tym produkcie a dostaniesz $1.00 rabatu!
  • Zawiera schematy
  • Plik do pobrania
  • Format PDF
  • Kompletna instrukcja
  • Język: English
Cena: $4.99

Opis SHARP SJ-68L-T2G Instrukcja Serwisowa

Kompletna instrukcja serwisowa w formie pliku PDF. Instrukcje serwisowe zazwyczaj zawierają schematy, diagramy drukowanych obwodów (PCB), schematy połączeń, schematy blokowe oraz katalog części. Instrukcje serwisowe są wykorzystywane glównie przez osoby naprawiające uszkodzony sprzęt.

Jeśli chcesz się dowiedzieć jak się obsługuje Twój telewizor, magnetowid, odtwarzacz mp3 itp. powinieneś raczej szukać instrukcji obsługi

Instrukcja jest dostępna w następujących językach: English

Plik nie jest jeszcze gotowy
Musisz najpierw dokonać zakupu.

Recenzje produktu
Dla tego produktu nie napisano jeszcze recenzji!
Recenzje innych produktów
 TX7520 ONKYO Instrukcja Serwisowa by Robert Teodorski;
Schematy są ale można wysilić się i zrobić kolorowy skan i o większej rozdzielczości. Wtedy schematy płytek będą czytelniejsze. Całość super jako wartość merytoryczna. Wszystkie dane potrzebne do podłączenia różnego rodzajów urządzeń takich gramofon, CD itd.
 CTV323 CLATRONIC Instrukcja Serwisowa by Bogdan Padechowicz;
Szybko, sprawnie i tanio. Serwis godny polecenia. Będę polecał innym
 CC8065 DUAL Instrukcja Serwisowa by Zbigniew Szarycz;
Ogólnie jest OK, z wyjątkiem obrazu płyty głównej, który jest miejscami mało czytelny, ale można sobie poradzić.
 KPE61MN11 SONY Instrukcja Serwisowa by Grzegorz Zawadzki;
Dokładna dokumentacja, pomogła w szybkiej naprawie telewizora. Dziękuję!
 RCM70L/LB JVC Instrukcja Serwisowa by Damian Mazek;
jedyne do czego mogę mieć zastrzeżenie to jakość zdjęć zawartych w przesłanej instrukcji serwisowej ponieważ są fatalnej jakości, praktycznie nieczytelne. tak poza tym jestem zadowolony to jest to czego szukałem.

Tekstowy podgląd strony 22 (kliknij aby zobaczyć)
SJ-58L-T2 SJ-63L-T2 SJ-68L-T2

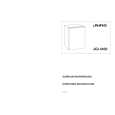
2 Replacing Handles and Door Parts
1. Remove Screw caps and Screws on each door handle, then remove the handles. Flatten the surface of the screw holes using the handle of a screwdriver, etc., then mount 3 units of F (Door hole covers) on each door. 2. Remove the Nylon bearings, Door stopper(Lower door only), Stopper springs on the right side of each door and the cap on the left side of the Upper door. Furthermore, open the hidden holes on the bottom of the door using a screwdriver, then remove a screw (Lower door only). 3. Remove Screw caps and Screws on the right side of each door, then remove the Door cap covers and mount D and E (Door cap covers) on the left side. 4. Replace Nylon bearings to the left side of each door, then mount the Upper door cap on the right side. Furthermore, mount Door stopper and B and C(Stopper springs) on the left side as well. Screw in a screw in the screw hole on the lower right of the Lower door. 5. Fix upper portion of Upper handle using one screw on the right side of Lower door, then temporarily fix the handle to the door using tape. 6. To open screw holes, first make marks on the doorplate surface through the 3 holes of the handle, then temporarily remove the handle (make sure that the dimensions of the markings are as shown in the diagram). 7. Lightly dent the center of each marking, then open holes using a 3.8 mm drill bit. Use a drill guide, etc., to prevent the drill bit from entering more than 5 mm. Make sure to open the hole straight. Opening the hole in an angle will cause the handle to clatter. The door will be unusable if the hole are too large or too deep or if the screws are tightened too much. 8. Mount the handle using the 4 screws and install Screw caps. 9. Mount Lower handle on the right side of Upper door by repeating steps 5. ~ 8. above.

2

F
12

4

2

5,6

16mm 27mm

3 1 3 4 4

172mm 172mm

D B
2 3

2

7

E
3 11
5mm

8

(J) F
2 4 2 4 2

5-8 9

C
Figure M-2

22

Klienci kupując ten produkt kupili także

$4.99

SX-K700 TECHNICS
Instrukcja Obsługi

Kompletna instrukcja obsługi w formie pliku PDF. Plik PDF zostanie dostarczony na Twój adres email…

$4.99

CJ-V51 PIONEER
Instrukcja Serwisowa

Kompletna instrukcja serwisowa w formie pliku PDF. Instrukcje serwisowe zazwyczaj zawierają schemat…

$4.99

GRAND PRIX ELECTRONIC 754 BECKER
Instrukcja Serwisowa

Kompletna instrukcja serwisowa w formie pliku PDF. Instrukcje serwisowe zazwyczaj zawierają schemat…

$4.99

SX-PR602 TECHNICS
Instrukcja Serwisowa

Kompletna instrukcja serwisowa w formie pliku PDF. Instrukcje serwisowe zazwyczaj zawierają schemat…

$4.99

EV-S1000E SONY
Instrukcja Obsługi

Kompletna instrukcja obsługi w formie pliku PDF. Plik PDF zostanie dostarczony na Twój adres email…

$4.99

GRAND PRIX ELECTRONIC 780 BECKER
Instrukcja Serwisowa

Kompletna instrukcja serwisowa w formie pliku PDF. Instrukcje serwisowe zazwyczaj zawierają schemat…

$4.99

AG7330 PANASONIC
Instrukcja Serwisowa

Kompletna instrukcja serwisowa w formie pliku PDF. Instrukcje serwisowe zazwyczaj zawierają schemat…

$4.99

EVO-9850 VOLUME 1 SONY
Instrukcja Serwisowa

Kompletna instrukcja serwisowa w formie pliku PDF. Instrukcje serwisowe zazwyczaj zawierają schemat…
>
Parse Time: 0.187 - Number of Queries: 134 - Query Time: 0.048