|
Dla tego produktu nie napisano jeszcze recenzji!
 ;
Wszystko w porządku.
Instrukcja czytelna i kompletna.
Dziękuję.
all right!
thank you.
;
Bardzo dobra instrukcja. Zawiera wszystko co potrzeba, polecam!
 ;
Instrukcja jest OK. Schematy czytelne, opisane niektóre procedury.
;
Instrukcja bardzo czytelna. zawiera co potrzeba. Polecam
;
...instrukcja serwisowa w pełni czytelna i kompletna. Dziękuję!
SP-PW880 <Amplifier> Removing the cover (See Fig.5)
1. Pull out the volume knob from the amplifier. 2. Remove the three screws E and the two screws F on the amplifier.
Volume knob
E
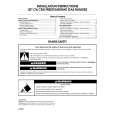
Removing the Input board assembly (See Fig.6)
1. Cut off the band under the input board assembly. 2. Disconnect the harness from connector CN851. 3. Remove the two screws G attaching the input amplifier / filter board assembly. Pull and disconnect connector CN811 from the body.
F
(Only US)
Fig.5
Cover
Removing the amplifier board assembly (See Fig.7 and 8)
Prior to performing procedure, remove the input amplifier / filter board assembly. 1. Disconnect the harness from connector CN891 and CN881 on the amplifier board assembly. 2. Remove the six screws H board assembly. attaching the amplifier
G
CN811 Input board assembly CN851
Band
3. Remove the two screws I attaching the heat sink 1 and the two screws J attaching the heat sink 2 respectively.
Fig.6
H
Heat sink 2
Amplifier board assembly
I J
CN881 CN891
H
H H
Heat sink 1
I J
Fig.7
Amplifier board assembly
Fig.7
1-4
|