|
|
|
Kategorie
|
|
Informacje
|
|
Polecamy
|
|
|
 |
|
|
Dla tego produktu nie napisano jeszcze recenzji!
 ;
Dokładna dokumentacja, pomogła w szybkiej naprawie telewizora. Dziękuję!
 ;
jedyne do czego mogę mieć zastrzeżenie to jakość zdjęć zawartych w przesłanej instrukcji serwisowej ponieważ są fatalnej jakości, praktycznie nieczytelne. tak poza tym jestem zadowolony to jest to czego szukałem.
;
Wszystko w porządku.
Instrukcja czytelna i kompletna.
Dziękuję.
all right!
thank you.
;
Bardzo dobra instrukcja. Zawiera wszystko co potrzeba, polecam!
;
Instrukcja jest OK. Schematy czytelne, opisane niektóre procedury.
MX-S6MD
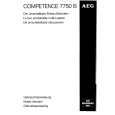
<Loading assembly> Removing the slide base (L) / (R) (See Fig.10)
1. Remove the two screws E on the upper side of the loading assembly. 2. Remove the slide base (L) outward. (Release it from the joint bosses E.) 3. Remove the slide base (R) outward.
Slide base (R)
E' E
Slide base (L)
E E'
Fig.10
Removing the loading assembly (See Fig.11)
mechanism
Part e
1. Detach the loading mechanism assembly upward to release the four pins on both sides from the loading motor, paying attention to the part e of the loading mechanism base.
Loading mechanism base Loading mechanism assembly Fig.11
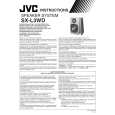
Loading mechanism assembly Removing the loading motor (See Fig.12 and 13)
1. Disconnect the harnesses from the wire holder and from connector CN612 on the cam switch board. 2. Remove the screw F attaching the loading motor and release the joint f. 3. Remove the belt from the loading motor assembly. 4. Remove the two screws G motor. attaching the loading
Loading motor assembly Joint f CN612
Wire holder
H
Cam switch board Slit washer
F
H
Cam gear
Fig.12
Removing the cam gear and the cam switch board (See Fig.12)
1. Remove the slit washer attaching the cam gear and pull out the cam gear. 2. Disconnect the harness from the wire holder and from connector CN612 on the cam switch board. 3. Remove the two screws H and the clamp. Remove the cam switch board.
Loading motor
G
Belt
Fig.13
1-15
|
|
|
> |
|