|
|
|
Kategorie
|
|
Informacje
|
|
Polecamy
|
|
|
Dla tego produktu nie napisano jeszcze recenzji!
 ;
...instruction is ok.
...instrukcja jest ok.
Thanks/Dzięki
;
Documentation made available quickly and It is good quality. Thanks.
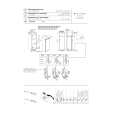
Figure-8
//// Assembly
1. Insert the front part of the key into the chassis. 2. Insert the plate spring into the hammer notch as shown in Figure-9 . 3. While slowly lowering the key into the chassis, insert the plate spring into the notch at the rear of the key. 4. Carefully insert the key into the opening in the chassis and slide the key towards the rear to lock it in place.
Figure-9
8.6. Disassembly of the pedal assembly 1. Remove the pedal assembly from the pedal box. 2. Disassemble the pedal assembly as shown in Figure-10 .
Figure-10
10
|
|
 |
> |
|