|
|
|
Kategorie
|
|
Informacje
|
|
Polecamy
|
|
|
 |
|
|
Dla tego produktu nie napisano jeszcze recenzji!
 ;
Wszystko w porządku.
Instrukcja czytelna i kompletna.
Dziękuję.
all right!
thank you.
;
Bardzo dobra instrukcja. Zawiera wszystko co potrzeba, polecam!
 ;
Instrukcja jest OK. Schematy czytelne, opisane niektóre procedury.
;
Instrukcja bardzo czytelna. zawiera co potrzeba. Polecam
;
...instrukcja serwisowa w pełni czytelna i kompletna. Dziękuję!
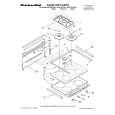
1. DISASSEMBLY
3. Remove the two screws, and then pull out the top cabinet.
2. Remove the rear panel.
1. Loosen the two screws, and then remove the left and right side panels.
5. Remove the front panel.
4. Remove the two screws, and then remove the bracket and pull out the bottom cabinet. 7. Remove the six screws, then remove the CA-2/CA-3/CA-4 board assemblies and the FPC, and disconnect the connector.
CA-3 board
9. Remove the two screws, and then remove the CA-1 board assembly.
CA-2 board
CA-4 board
CA-1 board
CA-5 board
6. Remove the six screws, and then disconnect the CA-5 board assembly connector from the CA-2 board assembly.
8. Remove the five screws, and then remove the lens mount bracket.
-2-
|
|
|
> |
|