|
|
|
Kategorie
|
|
Informacje
|
|
Polecamy
|
|
|
 |
|
|
Dla tego produktu nie napisano jeszcze recenzji!
 ;
Schematy są ale można wysilić się i zrobić kolorowy skan i o większej rozdzielczości. Wtedy schematy płytek będą czytelniejsze. Całość super jako wartość merytoryczna. Wszystkie dane potrzebne do podłączenia różnego rodzajów urządzeń takich gramofon, CD itd.
 ;
Szybko, sprawnie i tanio. Serwis godny polecenia. Będę polecał innym
;
Ogólnie jest OK, z wyjątkiem obrazu płyty głównej, który jest miejscami mało czytelny, ale można sobie poradzić.
;
Dokładna dokumentacja, pomogła w szybkiej naprawie telewizora. Dziękuję!
;
jedyne do czego mogę mieć zastrzeżenie to jakość zdjęć zawartych w przesłanej instrukcji serwisowej ponieważ są fatalnej jakości, praktycznie nieczytelne. tak poza tym jestem zadowolony to jest to czego szukałem.
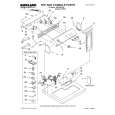
VL-Z7S/H/E/Z7E-A/Z7E-W VL-Z8H
3. DISASSEMBLY OF THE SET
3-1. Procedure for disassembling the cabinet
Note: Before removing the cabinet, turn OFF the power and make sure that the battery is not connected. 1.
· Remove the screw ((s) XiPSF14P06000). · Remove the shoe cover by sliding it frontward, remove the screw ((f) XiPSF17P04000) and remove the shoe terminal cover. · Remove the screw ((b) XiPSN17P03000). · Open the LCD panel 90 degrees and remove the two screws ((x)LXHZ0050TAFN). · Remove the two screws ((c)XiPSN17P04000) and remove the KS camera front cover by pulling it frontward.
LCD panel f Shoe terminal cover x b x
Shoe cover
s
c c KS camera front cover
2.
· Disconnect the connector of the KS camera front cover. · Disconnect the two LCD tilt FPCs of the liquid crystal panel. · Remove the two screws ((r) XiPSN20P08000) and remove the LCD panel. · Remove the screw ((p) LX-HZ0063TAFN) and screw ((q) XiPSN17P06000) that hold the camera L cabinet, open the terminal cover and remove the three screws ((b) XiPSN17P03000).
r r LCD panel
q p Camera L cabinet b
b LCD tilt FPC b
Terminal cover
Connector KS camera front cover
3.
· Disconnect the hot shoe FPC of the hot shoe and remove the camera L cabinet. · Remove the screw ((c) XiPSN17P04000) and remove the KS camera bottom cover. · Disconnect the strobe FPC, remove the two screws ((a) XiPSN17P02000) and remove the strobe unit.
Hot shoe FPC
Camera L cabinet
Precautions in servicing the strobe unit Once put in the card mode, the main condenser of the strobe unit stays still electrically charged. If touching the strobe unit or its nearby parts, you may get an electric shock. To avoid this, connect a 7 k� resistor (300-V withstand voltage) across the main condenser for about 10 seconds. The condenser will be discharged.
Ã¥
a
a Strobe unit Strobe FPC KS camera bottom cover c
4
|
|
|
> |
|