|
|
|
Kategorie
|
|
Informacje
|
|
Polecamy
|
|
|
 |
|
|
Dla tego produktu nie napisano jeszcze recenzji!
 ;
Wszystko w porządku.
Instrukcja czytelna i kompletna.
Dziękuję.
all right!
thank you.
;
Bardzo dobra instrukcja. Zawiera wszystko co potrzeba, polecam!
 ;
Instrukcja jest OK. Schematy czytelne, opisane niektóre procedury.
;
Instrukcja bardzo czytelna. zawiera co potrzeba. Polecam
;
...instrukcja serwisowa w pełni czytelna i kompletna. Dziękuję!
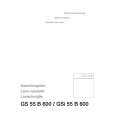
ADF INSTALLATION
17 May, 1999
[A] [H]
A859I111.WMF
[G]
[F]
[E]
[I] [D]
[B] [C]
A859I110.WMF
2. Remove the left scale [A] (2 screws). 3. Place the DF exposure glass [B] on the glass holder. NOTE: When installing the DF exposure glass, make sure that the white point [C] is positioned at the lower front side, as shown. 4. Peel off the backing [D] of the double side tape attached to the rear side of the scale guide [E], then install the scale guide (2 screws removed in step 2). 5. Install the two stud screws [F]. 6. Mount the DF by aligning the holes [G] in the DF with the stud screws, then slide the DF to the front as shown. 7. Secure the DF unit with two screws [H]. 8. Connect the cable [I] to the copier.
3-12
|
|
|
> |
|