|
Dla tego produktu nie napisano jeszcze recenzji!
2. Men~re and lightly mark e line 8VAnches from the right window jamb. NOTE: lf any sash stop protrudes more than 1 inch from the side window jambs, the 8W4nch measurement must be increased accordingly. Screen and storm window frames may also require adjustments to the measurement.
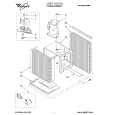
3. Center the platform ueembfy on the line with the inside platform tab pressed against the inside edge of the window track. Using the holes in the platform as a guide, mark and drill two !&-inch diameter holes. Drill holes in either track or stool. Centor pl&orm uoembly on the line with pl&orm bb prwud eghst window tmclr Alternate screw bc8Uon PI&form IMina on atool bb
Proper
Dammge Hazard
Be sure the wood stool or window track is securely attached to the building construction. Use longer screws into the subframing ff necessary. Failure to follow the above precaution could result in damage to the window or air conditioner.
4. Peel off the protecthro backing from the track seal. Apply seal to the room side of the window track. The center of the seal strip should coincide with the line marked in Step 2. The two screw holes drilled in Step 3 should be directly above the seal strip in the inner track
5. Securely attach a riding-protection board to the side of the house. OR To avoid permanent siding damage, attach the siding-protection board to the base of the support brace as shown. NOTE: The siding-protection board should be long enough to span 2 wall studs.
9
|