|
|
|
Kategorie
|
|
Informacje
|
|
Polecamy
|
|
|
 |
|
|
Dla tego produktu nie napisano jeszcze recenzji!
 ;
Dokładna dokumentacja, pomogła w szybkiej naprawie telewizora. Dziękuję!
 ;
jedyne do czego mogę mieć zastrzeżenie to jakość zdjęć zawartych w przesłanej instrukcji serwisowej ponieważ są fatalnej jakości, praktycznie nieczytelne. tak poza tym jestem zadowolony to jest to czego szukałem.
;
Wszystko w porządku.
Instrukcja czytelna i kompletna.
Dziękuję.
all right!
thank you.
;
Bardzo dobra instrukcja. Zawiera wszystko co potrzeba, polecam!
;
Instrukcja jest OK. Schematy czytelne, opisane niektóre procedury.
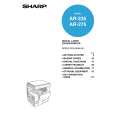
4. Toner cartridge installation
1) Shake the toner cartridge several times horizontally, and remove the tape.
4 or 5 times
� Screen display
Shutter Tape Knob
� Do not hold the shutter lever when shaking.
3) On the screen, all trays are indicated and the previously selected tray is highlighted. Use the Up/Down key to select the tray desired. � Screen display
2) Press the lock release lever, and insert the unit completely into the copier along the guide groove. Then fix the blue screw and the locking screw.
4) After selecting the tray, press the Right cursor key to move to the paper size selection box on the right side of the screen (the highlighted size is the previously selected size). Use the Up/Down key to select the desired paper size.
� Dirt or dust must be removed from the toner cartridge before
5) After selecting the paper size, press the Left cursor key to return to the left side of the screen. At that time, the selected tray indicates the paper size selected above.
installing. 3) Take off the tape, and remove the shutter from the toner cartridge.
Press the OK key to confirm the setting. The following message appears: � Message (M081)
5. Toner concentration sensor level adjustment
1) Open the cover. 2) Power ON (The mechanism cannot be initialized because the cover is open.) 3) Install the developing unit with new developer in it. 4) Enter SIM 25-2. 5) Close the cover immediately before starting the operation. 6) Press the OK key to start. After completion of the adjustment, be sure to cancel the simulation. Note: When replacing developer with new one, be sure to clear the developer counter. 6) After the Start key is pressed, if the fed paper is different in size from the setting, the machine makes copy and then stops running with the mode retained. The following message appears for six seconds. the Start LED is ON): The tray set EXTRA size is not available for this specification. � Message (C449)
6. Paper size selection for paper feed tray
1) The paper feed trays have no paper size detection mechanism and the paper size can be selected by entry from the operation panel. The bypass tray has a paper size detection mechanism and the paper size cannot be selected from the operation panel. 2) To select the paper size from the operation panel, press the Special Function key and choose "Paper Size Enter" from the function menu to open the paper size enter screen.
7) If any of Trays 2 to 4 is selected, the paper sizes of A5/5.5 x 8.5 are not available (because the A5/5.5 x 8.5-sized paper cannot be fed from these trays).
AR-235/275 UNPACKING AND INSTALLATION - 2
|
|
|
> |
|