|
Dla tego produktu nie napisano jeszcze recenzji!
5gb10005.fm5 Page 121 Friday, April 6, 2001 3:22 PM
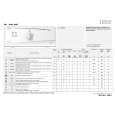
Water stop anti-flooding system
(depending on model) � Screw the hose to the water supply tap. Turn the tap fully on and check the water-tightness of the connection. � The appliance must not be connected to the mixing tap of a non-pressurized water heater! � The inlet hose and the plastic enclosure contain electrical components: Do not cut the hose and do not immerse the enclosure in water. � If the flexible hose is damaged, unplug the appliance from the mains immediately and replace it. If the flexible hose is too short, replace it with a 3 m Water Stop hose (available from After-Sales Service or from your dealer). This operation must be carried out exclusively by a qualified technician.
Connect the water drain hose
1. Unhook the drain hose from the left and right hose connections, see arrow A in figure. Important: Do NOT loosen the drain hose connection from the left side, see arrow B in figure. Otherwise, there is the risk of leakage and of scalding with hot water. 2. Fix the �U� bend (C) to the free end of the drain hose. 3. Connect the drain hose to the siphon or hook it over the edge of a sink with the �U� bend. Small hand basins are not suitable. The edge of the sink must be no more than 100 cm from the floor. If you need to add an extension, use a flexible hose of the same size and secure the unions with screw-on hose clips. Maximum overall drain hose length: 2.50 m. Maximum drain height (�U� bend): 100 cm. Minimum drain height: 55 cm. Important: Make sure there are no kinks in the drain hose and take precautions against it falling while the appliance is running.
A
C B
121
|