AZ1833_05 2007.7.17 16:32 Page 1
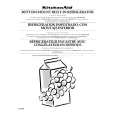
The wires in the mains lead are coloured MP3-CD Soundmachine AZ1833 English Controls / Power Suppy
How to connect a plug
1
come to Philips! mass storage device
Important notes for users in the U.K.
brown = live (L). As these colours may not Mains plug fying terminals in your plug, proceed as To fully benefit from the support that Philips Register your product and get support at This apparatus is fitted with an approved 13 plug proceed as follows:
Congratulations on your purchase and wel! USB DIRECT � connects an external USB with the following code: blue = neutral (N),
correspond with the colour markings identi-
www.philips.com/welcome follows: offers, register your product at Back panel (See 1) Amp plug.To change a fuse in this type of
reception # AUX IN jack � connects to external audio source
@ Telescopic antenna � improves FM � Connect blue wire to the terminal www.philips.com/welcome.
1. Remove fuse cover and fuse. 2. Fix new fuse which should be a BS1362 5 Amp, A.S.T.A. or BSI approved type. 3. Refit the fuse cover. Before replacing the plug cover, make cerIf the fitted plug is not suitable for your R-14/ UM2/ C-cells socket outlets, it should be cut off and an appropriate plug fitted in its place. If the mains plug contains a fuse, this should have Recording and playback of material may and wall outlet before inserting batteries. should not be greater than 5 Amp. and The Performer�s Protection Acts 1958 Note:The severed plug must be disposed ! Batteries to 1972. 7 of to avoid a possible shock hazard should � For disc/ USB play: Main set (See 1)
marked N or coloured black.
� Connect brown wire to the terminal
marked L or coloured red. Supplied accessories
terminal in the plug, marked E (or e) or
% 8 coloured green (or green and yellow). Battery door � open to insert 6 x 1.5V
$ AC~ MAINS � inlet for power cord
� AC power cord � Do not connect either wire to the earth
1
tain that cord grip is clamped over the 2
User Manual
� Audio cable
9 Top and front panels (See 1)
1 Source selector: CD/USB/AUX, FM, MW, OFF 0 � selects CD/MP3-CD, USB, AUX or radio � switches off the set
a value of 5 Amp. If a plug without a fuse is cord if you want to conserve battery life. used, Make sure you remove plug from the set the fuse at the distribution board require consent. See Copyright Act 1956
two wires. Whenever convenient, use the power supply 3
sheath of lead not simply over the Power Supply
4 5 Copyright in the U.K.
6 � §
2 2; � starts or pauses disc/USB playback
� skips to the beginning of a current/ � Insert 6 batteries, type R-14, UM2 or Cit be inserted into a 13 Amp socket else-
previous/ later track cells (not included, preferably alkaline) with 4 where.
� fast searches backwards and forwards the correct polarity.
within a track � Incorrect use of batteries can cause elec9 � stops disc/USB playback; trolyte leakage and will corrode the compart� erases a program ment or cause the batteries to burst:
PROG � programs tracks and reviews the � Do not mix battery types: e.g. alkaline with
program carbon zinc. Only use batteries of the same 4 ALBUM +/AUX IN
3 Display � shows disc/USB play functions type for the set.
@
� When inserting new batteries, do not try to
albums � Remove the batteries if the set is not to be #
AC MAINS~
� For MP3-CD/ WMA/USB play: select mix old batteries with the new ones.
$ 5 � enters USB mode used for a long time.
6 CD � enters disc mode
Batteries contain chemical substances, so
7 MODE � selects different play modes:
they should be disposed of properly. %
Using AC power e.g. REPEAT or SHUFFLE (random order) on the type plate located on the door
6 x R14 UM-2 � C-CELLS
1 Check if the power/mains voltage, as shown 8 OPEN�CLOSE � opens/ closes the CD
bottom of the set, corresponds your 9 TUNING � tunes to radio stations
0 VOLUME � adjusts volume level local power supply. If it does not, consult your
dealer or service center.
Power Supply Basic Function / Radio MP3-CD / CD Player
DISC
2 8
2 If your set is equipped with a voltage 2 Press CD to enter CD mode if USB is dis-
English
function
Meet Philips at the Internet
selector, adjust the selector so that it matchplayed. Basic functions About MP3 The music compression technology MP3 AC~ MAINS inlet and the wall socket.The 1 To switch on, adjust the source selector to CD/USB/AUX, FM or MW as desired. maintaining CD quality sound. the digital data of an audio CD while
http://www.philips.com
(MPEG1 Audio Layer 3) significantly reduce
� Display will show --with �DISC�(See 2). es with local power supply. Switching on/off the set and selecting 4 Insert a disc with the printed side facing up set and press the disc door gently to close. is now ready for use. 4 To switch set off completely, withdraw the 2 To switch off, adjust the source selector to � Getting MP3 files: you can either download computer hard disc, or create such files by converting audio CD files in your computer � Disconnect power cord from the wall control. through appropriate encoder software.
DISC derstorms. Children could seriously injure
3 Open the disc door.
3 Connect the power cord to the
3
power cord from the wall socket. legal music files from the internet to your OFF.
USB
� Display:The total number of tracks Adjusting volume 5 Install unit near the AC outlet and where the AC power plug can be easily reached. socket to protect your set during heavy thun(128kbps bit rate or higher is recommended for MP3 files.) 4 1 Push the source selector to FM or MW. from your computer hard disc on a CDR or � The current track number �XXX� and still be live if only the connector is removed
appears.
� The disc scanning of MP3-CD may run
longer than audio CD. Adjust volume with the VOLUME
5 Press 2; to start playback.
� Creating a MP3 CD: burn the music files X themselves as free end of the cable may Radio reception For MP3-CD/ WMA only: 2 Turn TUNING to tune in a radio station. CDRW using your CD burner. The type plate is located on the selector to OFF. 6 To pause playback press 2;. � Make sure that file names of the MP3 files 5 bottom of the set. 3 To switch off the radio, adjust the source
unit. displayed interchangeably (See 4 5).
W
� For FM, extend, incline and turn the � Number of tracks: maximum 511 � avoid unnecessary energy consumption, 8 To stop playback, press 9. Helpful hints:
� Display: 2 and the current track number.
from the MAINS socket at the back of the album number �XXX� with �ALB� will be
Helpful hints:
� Display: 2 and the current track number
� Number of albums: maximum 256 Helpful hints: To improve reception 7 Press 2; again to resume playback.
end with .mp3 or .wma. Helpful hints: flash.
DISC
CLASS 1 always adjust the source selector to OFF
after using the set.
6 more files can be burned on disc. � you open the disc compartment door; � For MW, uses a built-in antenna. Direct this
tracks for playback. With shorter file names, The disc playback will also stop when: LASER PRODUCT signal is too strong.
� The length file names affects the number of telescopic antenna. Reduce its length if the
9 CAUTION antenna by turning the whole set. � you select FM, MW or OFF position;
DISC
Playing a disc Use of controls or adjustments
� disc has reached end of the playback.
WMA desired track number appears in the display.
This player plays Audio Discs including CD-R/ AZ1833 or performance of procedures CD-RW, MP3 CD and WMA. Do not try to other than herein may result in Selecting a different track play a CD-ROM, CD-I, CDV,VCD, DVD or unsafe operation. � Press � § once or repeatedly until the
DISC computer CD.
7
For users in the U.K., please follow For MP3-CD/WMA: First press the boxed instructions �Important ALBUM+/once or more to find your IMPORTANT! notes for users in the U.K.� . album. This set complies with the radio be unplayable by this product. playback. interference requirements of the European Community. 1 Adjust the source selector to
USB mass storage device USB cable
� CDs encoded with copyright protection
� In the pause/stop position, press 2; to start technologies by some record companies may
� DRM-protected WMA disc is not supported.
CD/USB/AUX. � Display shows with �DISC�(see 2),
or with �USB� (see 3) Printed in China JS-0731