|
|
|
Kategorie
|
|
Informacje
|
|
Polecamy
|
|
|
 |
|
|
Dla tego produktu nie napisano jeszcze recenzji!
 ;
jedyne do czego mogę mieć zastrzeżenie to jakość zdjęć zawartych w przesłanej instrukcji serwisowej ponieważ są fatalnej jakości, praktycznie nieczytelne. tak poza tym jestem zadowolony to jest to czego szukałem.
 ;
Wszystko w porządku.
Instrukcja czytelna i kompletna.
Dziękuję.
all right!
thank you.
;
Bardzo dobra instrukcja. Zawiera wszystko co potrzeba, polecam!
;
Instrukcja jest OK. Schematy czytelne, opisane niektóre procedury.
;
Instrukcja bardzo czytelna. zawiera co potrzeba. Polecam
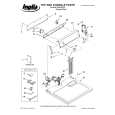
1-3. Removal of Cabinet
1-3. Removal of Cabinet
1-3-1. Removal of Front Panel
1. Turn the power off. 2. Unplug the appliance from the outlet. 3. Loosen the locking screw on the front panel using a flat-blade screwdriver. 4. Pull the locking screw toward you and open the front panel.
1-3-2. Removal of Upper Chassis
1. 2. 3. 4. Turn the power off. Unplug the appliance from the outlet. Remove the front panel. (Refer to the Section 1-3-1.) Remove the two screws and the harness clamper shown in the figure.
Front panel B 3x6 Harness clamper Locking screw
5. Disconnect the connector CN701 on the DEC-99 board. 6. Push the hinge shaft in the direction of the arrows while holding the front panel, and remove the front panel.
5. Remove the four screws, and remove the rack angles of both sides. 6. Remove the 15 screws shown in the figure, and pull up the upper chassis.
Upper chassis B 3x6 B 3x6 B 3x6 B 4x10
Front panel CN701
B 3x6 B 3x6 Rack angle
B 4x10
B 3x6
Rack angle
Hinge shaft
DEC-99 board
1-2 (E)
BDX-D1000
|
|
|
> |
|