|
|
|
Kategorie
|
|
Informacje
|
|
Polecamy
|
|
|
 |
|
|
Dla tego produktu nie napisano jeszcze recenzji!
 ;
Ogólnie jest OK, z wyjątkiem obrazu płyty głównej, który jest miejscami mało czytelny, ale można sobie poradzić.
 ;
Dokładna dokumentacja, pomogła w szybkiej naprawie telewizora. Dziękuję!
;
jedyne do czego mogę mieć zastrzeżenie to jakość zdjęć zawartych w przesłanej instrukcji serwisowej ponieważ są fatalnej jakości, praktycznie nieczytelne. tak poza tym jestem zadowolony to jest to czego szukałem.
;
Wszystko w porządku.
Instrukcja czytelna i kompletna.
Dziękuję.
all right!
thank you.
;
Bardzo dobra instrukcja. Zawiera wszystko co potrzeba, polecam!
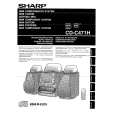
SETTING THE CLOCK PREPARATION FOR USE
q Replace batteries if the operating distance becomes rePress the CLOCK button.
Press ON/STAND-BY button to enter the stand-by mode.
1 2 3
CD-C471H
4
display mode. of the unit. "0:00" � The 24-hour display will appear. "AM 12:00" � The 12-hour display will appear. "AM 0:00" � The 12-hour display will appear. (AM or PM 12:00 11:59) (0:00 23:59)
Notes concerning use: In this example, clock is set for the 24-hour (0:00) system. duced or if operation becomes erratic. q Periodically clean transmitter LED on the remote control and sensor on the main unit with a soft cloth. Within 5 seconds, press the MEMORY/SET button. ON/ q Exposing sensor on the main unit to strong light may STAND-BY interfere with operation. Change lighting direction Press TUNING/TIME ( or ) button to select the time q Keep the remote control away from moisture, excessive heat, (8" 20') shock, and vibrations.
CLOCK 0.2 6 m
TUNING/ 1 5 (AM or PM 0:00 11:59) 1 TIME MEMORY/ q Note that this can only be set when the unit is first installed ( / ) SET or it has been reset (see page 30).
5 Press the MEMORY/SET button.
q Press the TUNING/TIME ( or ) button once to advance the time by 1 hour. Press for more than 0.5 seconds to adq When the 12-hour display is selected, "AM" will change automatically to "PM". Reset microcomputer under the following conditions: q To erase all of the stored memory contents (clock and timer minutes. q Press button for at least 0.5 seconds to change the time q The hour setting will not even if minutes advance from "59" to "00". Note: q To tuner preset memory, see "To erase all of the q The clock starts operating from "0" seconds. (Seconds are not displayed.) Press ON/STAND-BY button to enter the stand-by mode. While pressing down VOLUME button and the TUNq In event of a failure or when the AC power lead is disconnected, the clock display will go out. settings, tuner and CD presets).
2 6 Press TUNING/TIME ( or ) button to adjust the hour.
3 vance continuously.
4 RESETTING THE MICROCOMPUTER 7 Press the MEMORY/SET button.
12:00 AM 0:00 8 Press TUNING/TIME ( o r ) button to adjust the 1
in 5-minute intervals.
5 2 6 9 2
q If the display is not correct. q If the operation is not correct.
OPERATION MANUAL
�6�
contents Press the MEMORY/SET button. of preset memory" on page 18.
1
ING/TIME button, hold down the ON/STAND-BY button for at least 1 second. When AC power supply is restored, the clock display will
7 Note: 2 8
flash on and off to indicate time when the power failure occurred or when the AC power lead was disconnected. If this happens, follow procedure below to change the clock time.
9
change clock time: To see the time display:
q The time display will appear for about 5 seconds. q When unit is in the demonstration mode, press
When unit is in stand-by mode: Press the CLOCK button.
DEMO button to enter the clock mode.
x Press the MEMORY/SET button. To change the time display mode: y Perform steps 6 9 above. x Press ON/STAND-BY button to enter the stand-by mode. ING/TIME button, hold down the ON/STAND-BY button for at least 1 second. z Perform steps 6 9 above. Caution: q The operation explained above will erase all data stored in memory including clock timer settings, tuner and CD presets.
When the unit is on: y Whilst pressing down VOLUME button and the TUNx Press the CLOCK button. y Within 5 seconds, press the MEMORY/SET button. z Perform steps 6 9 above.
|
|
|
> |
|