|
|
|
Kategorie
|
|
Informacje
|
|
Polecamy
|
|
|
 |
|
|
Dla tego produktu nie napisano jeszcze recenzji!
 ;
Schematy są ale można wysilić się i zrobić kolorowy skan i o większej rozdzielczości. Wtedy schematy płytek będą czytelniejsze. Całość super jako wartość merytoryczna. Wszystkie dane potrzebne do podłączenia różnego rodzajów urządzeń takich gramofon, CD itd.
 ;
Szybko, sprawnie i tanio. Serwis godny polecenia. Będę polecał innym
;
Ogólnie jest OK, z wyjątkiem obrazu płyty głównej, który jest miejscami mało czytelny, ale można sobie poradzić.
;
Dokładna dokumentacja, pomogła w szybkiej naprawie telewizora. Dziękuję!
;
jedyne do czego mogę mieć zastrzeżenie to jakość zdjęć zawartych w przesłanej instrukcji serwisowej ponieważ są fatalnej jakości, praktycznie nieczytelne. tak poza tym jestem zadowolony to jest to czego szukałem.
CDX-M8086ZT ,M8086ZT-91,M8186ZT ,M8186ZT-91
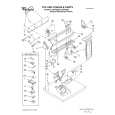
7.2.2 DISASSEMBLY
- Removing the Case and Holder(Fig.19)
1. Remove the six screws. 2. Remove the upper case, lower case and holder.
- Removing the Extension Unit(Fig.20)
1. Remove the one screw. 2. Unbend the two tabs indicated by arrows until straight. 3. Remove the extension unit.
- Removing the Grille Assy(Fig.19)
1. Press the four tabs indicated by arrows and then pull out the grille assy.
- Removing the Main Unit(Fig.20)
1. Remove the two screws and earth. 2. Unbend the tab indicated by arrow until straight. 3. Remove the main unit. NOTE: Connect the extension PCB to the main unit via the connector, with the printing on the connector facing downward.
A
Fig. 20 Fig. 19 NOTE: To prevent screw A from working loose, apply glue between screw A and the main unit when installing the main unit to the CD mechanism unit. Before disconnecting the connector, attach a short pin as illustrated.
49
|
|
|
> |
|