|
|
|
Kategorie
|
|
Informacje
|
|
Polecamy
|
|
|
 |
|
|
Dla tego produktu nie napisano jeszcze recenzji!
 ;
Wszystko w porządku.
Instrukcja czytelna i kompletna.
Dziękuję.
all right!
thank you.
;
Bardzo dobra instrukcja. Zawiera wszystko co potrzeba, polecam!
 ;
Instrukcja jest OK. Schematy czytelne, opisane niektóre procedury.
;
Instrukcja bardzo czytelna. zawiera co potrzeba. Polecam
;
...instrukcja serwisowa w pełni czytelna i kompletna. Dziękuję!
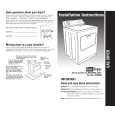
SECTION 4 DIAL POINTER INSTALLATION
Note : Follow the installation procedure in the numerical order given. 1 Align the pointer with the groove of �cabinet (front) sub ASSY� and insert it as shown in the illustration. 2 Align knob (TU) with �cabinet (front) sub ASSY� and fasten the screw.
Cabinet (front) sub ASSY
CFD-V6
1 Pointer
knob (Tu)
2 Screw (+BVTP 2.6 � 8)
3 Turn the tuning knob fully in the direction of the allow as shown in the illustration. 4 Turn the tuning capacitor gear fully in the direction of the allow as shown in the illustration. 5 Fasten the �cabinet (front) sub ASSY� and cabinet (rear) with the screws.
5
4 Tuning capacitor gear
Cabinet (rear)
3 Tuning knob
Cabinet (front) sub ASSY
9
|
|
|
> |
|