|
|
|
Kategorie
|
|
Informacje
|
|
Polecamy
|
|
|
 |
|
|
Dla tego produktu nie napisano jeszcze recenzji!
 ;
Dokładna dokumentacja, pomogła w szybkiej naprawie telewizora. Dziękuję!
 ;
jedyne do czego mogę mieć zastrzeżenie to jakość zdjęć zawartych w przesłanej instrukcji serwisowej ponieważ są fatalnej jakości, praktycznie nieczytelne. tak poza tym jestem zadowolony to jest to czego szukałem.
;
Wszystko w porządku.
Instrukcja czytelna i kompletna.
Dziękuję.
all right!
thank you.
;
Bardzo dobra instrukcja. Zawiera wszystko co potrzeba, polecam!
;
Instrukcja jest OK. Schematy czytelne, opisane niektóre procedury.
P501
30
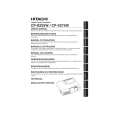
5. Wiring when the drive board is installed 1 Connect and lay the CNBAR cable and the connector #6222 cable. 2 Connect the CNTH, the CNPOW, the #6220 and the #6221. 3 Connect the CNRM, the CNLC and the #3020. 4 Connect the LC panel (R, G and B) flexible cables.
#6221
Procedure Before installing the drive board, connect the CNBAR and the #6222 with the drive board while holding them by hand. Pass the CNBAR lead through the cable guide on the ballast board cover. Put the drive board on its position and connect the CNTH, the CNPOW, the #6220 and the #6221 while lifting the drive board rear part. Finally, connect the CNRM, the CNLC, the #3020 and the flexible cables of the panels.
Circuit power supply cable Connect the cable to the E800 on the drive board. Panel B fan connector cable through the top of ballast cover as figure. (To prevent the B fan connector cable from the power supply is approached.) CNBAR cable through the cable guide on the ballast board cover.
Fan for panel G Connect the cable to the E803 on the drive board.
Thermistor cable Fan for panel R Connect the #6220 (connector color: black marking) CNTH cable to the CNPOW E302 on the Connect the cable to the E802 (black marking) on drive board. the drive board.
#6222
Fan for panel B Connect the cable to the E801 on the drive board Ballast control line cable
E803 E802
E302
E800 E801
CNBAR Connect the cable to the
E805 on the drive board. Lamp door switch cable
CNLC
P701
E805 E807
Connect the cable to the E807 on the drive board.
CNRM
E806
E804
P601
Remote control board cable Connect the cable to the E806 on the drive board.
CNSP
screw
Drive board assembly Connect the flexible cables of the panels to the flexible connectors (R to the P701, G to the P601 and B to the P501). 1 Pull out the hinge in the arrowed direction. 2 Insert the flexible cable under the hinge bottom. 3 Push the hinge in the arrowed direction. Hinge Flexible cable
#3020
Exhaust fan (connector color: black) Connect the cable to the E804 (black) on the drive board.
3 screws Caution when assembly the PWB Ass'y Drive Connect board to board connector on PWB Ass'y Drive and input firmly, before fixing 3 screws.
|
|
|
> |
|