|
|
|
Kategorie
|
|
Informacje
|
|
Polecamy
|
|
|
 |
|
|
Dla tego produktu nie napisano jeszcze recenzji!
 ;
Dokładna dokumentacja, pomogła w szybkiej naprawie telewizora. Dziękuję!
 ;
jedyne do czego mogę mieć zastrzeżenie to jakość zdjęć zawartych w przesłanej instrukcji serwisowej ponieważ są fatalnej jakości, praktycznie nieczytelne. tak poza tym jestem zadowolony to jest to czego szukałem.
;
Wszystko w porządku.
Instrukcja czytelna i kompletna.
Dziękuję.
all right!
thank you.
;
Bardzo dobra instrukcja. Zawiera wszystko co potrzeba, polecam!
;
Instrukcja jest OK. Schematy czytelne, opisane niektóre procedury.
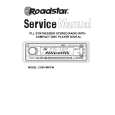
CR14
� Assembly of Change arm
Step 24: Insert service jig into the traverse hole, rotate the gear clockwise. Step 22: Slot the traverse unit assy onto the UD base as arrow shown. Note: Ensure the bosses fix exactly onto the guides. Note: Ensure the groove of the TRV slide plate assy stop at the position shown.
Step 23: Push the guide to lock the traverse unit assy in.
Step 25: Install the change arm to the groove of the TRV slide plate assy. Step 26: Push the TRV slide plate assy as arrow shown to lock the change arm.
45
|
|
|
> |
|