|
|
|
Kategorie
|
|
Informacje
|
|
Polecamy
|
|
|
 |
|
|
Dla tego produktu nie napisano jeszcze recenzji!
 ;
jedyne do czego mogę mieć zastrzeżenie to jakość zdjęć zawartych w przesłanej instrukcji serwisowej ponieważ są fatalnej jakości, praktycznie nieczytelne. tak poza tym jestem zadowolony to jest to czego szukałem.
 ;
Wszystko w porządku.
Instrukcja czytelna i kompletna.
Dziękuję.
all right!
thank you.
;
Bardzo dobra instrukcja. Zawiera wszystko co potrzeba, polecam!
;
Instrukcja jest OK. Schematy czytelne, opisane niektóre procedury.
;
Instrukcja bardzo czytelna. zawiera co potrzeba. Polecam
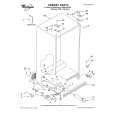
XLR-10 Installation
First make sure that the CR-1604 is turned off. Flip it upside down with the jacks facing you (there is no need to actually remove the pod) and remove the small connector cover near the pod's center. Save the cover and screws by taping them to the bottom of the mixer. Remove the pod's rubber feet. 3 Install the ribbon connector which extends out of the XLR10 by pressing the plug onto the exposed pins. Make sure that the stripe on the ribbon is on the side closest to the XLR 10's phantom switch (the right side in our drawing).
2 1
Operating Instructions
When you combine the CR-1604 with the XLR10 you can use the added mic inputs by themselves or,mic and line inputs simultaneously. use both if you're starved for inputs, you can In other words, with the XLR10, you actually get 10 more inputs. On Channels 7 through 16 only, the XLR mic inputs can be used with the existing line inputs. Each has its own sensitivity control. Set the sensitivity controls as you normally would. Put the channel into SOLO to read its operating level on the main output meter. 1. Adjust the mic sensitivity control first . 2. With the mic placed where it will normally operate in relation to the acoustic source, start at minimum (fully counterclockwise), then turn the gain up until you get a reading of around 0dB on the meter. 3. Finally, adjust the line input sensitivity until you get the desired balance between mic and line signals.
As you lower the XLR10 towards the CR-1604 pod, work the excess ribbon cable back into the XLR10 by wiggling it gently.
5 Slide the tabs on the sides of the XLR10 into the slots on the top of the CR- 1604 and secure them with the four #8 screws provided. Don't push on the screws while attaching them, since doing so may dislodge the mounted nuts on the inside of the pod. 6 Install the new pod feet.
4
Happy mixing!
pod �foot�
2
connector cover
1
pod �foot�
2
C
R- 1 60 4
CR-1604 pod 48V phantom switch XLR10 tab A tab A slot B
3
stripe ribbon connector
slot B
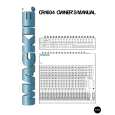
Famous XLR10 Interview Questions
Q. Can the XLR10 be used in all of the three pod variations? A. Yes, see the drawing below. Q. Can the XLR10 be used with anything other than the CR-1604? A. No, it utilizes the internal power supply of the CR-1604 and is not free standing.
4
4.8" 0.7"
16.1"
3.8"
0.5"
5.9"
6.4"
pod �foot� #8 screws
pod �foot� #8 screws
15.8"
18.2"
5
5
5.9"
2.3"
12.0"
2.3"
2-4
POD BOARD 02 Rev N
©1994,©1999 Mackie Designs Inc. All rights reserved
|
|
|
> |
|