|
|
|
Kategorie
|
|
Informacje
|
|
Polecamy
|
|
|
 |
|
|
Dla tego produktu nie napisano jeszcze recenzji!
 ;
jedyne do czego mogę mieć zastrzeżenie to jakość zdjęć zawartych w przesłanej instrukcji serwisowej ponieważ są fatalnej jakości, praktycznie nieczytelne. tak poza tym jestem zadowolony to jest to czego szukałem.
 ;
Wszystko w porządku.
Instrukcja czytelna i kompletna.
Dziękuję.
all right!
thank you.
;
Bardzo dobra instrukcja. Zawiera wszystko co potrzeba, polecam!
;
Instrukcja jest OK. Schematy czytelne, opisane niektóre procedury.
;
Instrukcja bardzo czytelna. zawiera co potrzeba. Polecam
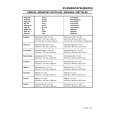
HOW TO INITIALIZE THE TV/DVD
To put the program back at the factory-default, initialize the TV/DVD as the following procedure.
< DVD Section >
1. Press [1], [2], [3], [4], and [DISPLAY] buttons on the remote control unit in that order. Fig. g appears on the screen.
"*******" differs depending on the models.
< TV Section >
1. Use the service remote control unit. 2. Turn the power on. (Use main power on the TV unit.) 3. Press [DISC MENU] button on the service remote control unit to enter the Service mode. (Refer to �How to enter the Service mode� on page 1-6-1.)
MODEL : ******* Version : *.** Region : *
4. Confirm that OSD indication on the four corners on TV screen changes from on and off light indication to red by pressing a [DISPLAY] button. (It is necessary for one or two seconds.)
EXIT: SELECT
EEPROM CLEAR : CLEAR
Fig. g
5. Turn the power off by pressing main power button on the TV unit, and unplug the AC cord from the AC outlet.
2. Press [CLEAR] button on the remote control unit. Fig. h appears on the screen.
"*******" differs depending on the models.
MODEL : ******* Version : *.** Region : * EEPROM CLEAR : OK
EEPROM CLEAR : CLEAR
EXIT: SELECT
Fig. h
When �OK� appears on the screen, the factory default will be set. 3. To exit this mode, press [CH. o / p] or [SELECT] button to go to TV mode, or press [STANDBY-ON] button to turn the power off.
1-7-1
T8202INT
|
|
|
> |
|