|
Dla tego produktu nie napisano jeszcze recenzji!
 ;
Wszystko w porządku.
Instrukcja czytelna i kompletna.
Dziękuję.
all right!
thank you.
;
Bardzo dobra instrukcja. Zawiera wszystko co potrzeba, polecam!
 ;
Instrukcja jest OK. Schematy czytelne, opisane niektóre procedury.
;
Instrukcja bardzo czytelna. zawiera co potrzeba. Polecam
;
...instrukcja serwisowa w pełni czytelna i kompletna. Dziękuję!
1
2
3
4
7. GENERAL INFORMATION
7.1 DIAGNOSIS
A
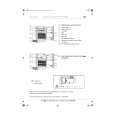
7.1.1 DISASSEMBLY
- Removing the Case (not shown) 1. Remove the Case.
- Removing the CD Mechanism Module (Fig.1)
CD Mechanism Module
1
B
Remove the four screws.
Disconnect the connector and then remove the CD Mechanism Module.
1 1
- Removing the Grille Assy (Fig.1)
2
C
Remove the two screws and then remove the Grille Assy.
1 2 1 2
Grille Assy
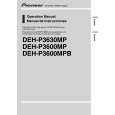
- Removing the Tuner Amp Unit (Fig.2)
Fig.1
1
D
Remove the screw.
2
2 2
2 3 4
Remove the three screws.
Straighten the tabs at three locations indicated. Remove the screw and then remove the Tuner Amp Unit.
4 1
E
3
3
3
Tuner Amp Unit
Fig.2
F
54
1 2
DEH-P3600MP/XM/EW
3 4
|