|
|
|
Kategorie
|
|
Informacje
|
|
Polecamy
|
|
|
 |
|
|
Dla tego produktu nie napisano jeszcze recenzji!
 ;
Wszystko w porządku.
Instrukcja czytelna i kompletna.
Dziękuję.
all right!
thank you.
;
Bardzo dobra instrukcja. Zawiera wszystko co potrzeba, polecam!
 ;
Instrukcja jest OK. Schematy czytelne, opisane niektóre procedury.
;
Instrukcja bardzo czytelna. zawiera co potrzeba. Polecam
;
...instrukcja serwisowa w pełni czytelna i kompletna. Dziękuję!
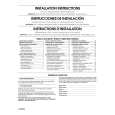
2-1-4. UV-46 Board
Remove the front door assembly. (Refer to Section 1-2-1.) Remove the ribbon door. (Refer to Section 1-2-2.) Remove the cabinet (L) assembly. (Refer to Section 1-2-3.) Remove the FT panel assembly. (Refer to Section 1-2-4.) Remove the ferrite holder. (Refer to Section 2-8.) Remove the DK-46 board. (Refer to Section 2-1-3.) Remove the paper eject guide assembly. (Refer to Section 2-3.) 8. Remove the switching regulator. (Refer to Section 2-2.) 9. Remove the F chassis assembly. (Refer to Section 2-4.) 10. Remove the two screws and two filament tapes, then remove the UV cover and UV-46 board in the direction shown by the arrow. 11. Disconnect the flexible flat cable from the connector (CN431) on the UV-46 board.
BTP 2.6 x 8 Flexible flat cable
2-1-5. MD-46 Board
Remove the ribbon door. (Refer to Section 1-2-2.) Remove the cabinet (L) assembly. (Refer to Section 1-2-3.) Remove the ferrite holder. (Refer to Section 2-8.) Disconnect the seven harnesses from the connectors (CN309, CN901, CN903, CN904, CN905, CN906 and CN908) and two flexible flat cables from the connectors (CN902 and CN910) on the MD-46 board. 5. Remove the three screws, then remove the MD-46 board. 1. 2. 3. 4.
1. 2. 3. 4. 5. 6. 7.
CN906 CN309 CN910
CN905
CN903
CN904 CN908
BTP 2.6 x 8
MD-46 board (Side A)
UV cover
CN902 BVTT 2.6 x 5
CN901
Flexible flat cable Harness
CN431 UV-46 board
Harnesses
Harnesses
Filament tapes
MD-46 board
Harness
Flexible flat cable
Cabinet (R) assembly
12. Install the UV-46 board in the reverse order of steps 1 to 11.
DPP-EX50 V1
6. Install the MD-46 board in the reverse order of steps 1 to 5. 2-3
|
|
|
> |
|