|
Dla tego produktu nie napisano jeszcze recenzji!
 ;
Dokładna dokumentacja, pomogła w szybkiej naprawie telewizora. Dziękuję!
 ;
jedyne do czego mogę mieć zastrzeżenie to jakość zdjęć zawartych w przesłanej instrukcji serwisowej ponieważ są fatalnej jakości, praktycznie nieczytelne. tak poza tym jestem zadowolony to jest to czego szukałem.
;
Wszystko w porządku.
Instrukcja czytelna i kompletna.
Dziękuję.
all right!
thank you.
;
Bardzo dobra instrukcja. Zawiera wszystko co potrzeba, polecam!
;
Instrukcja jest OK. Schematy czytelne, opisane niektóre procedury.
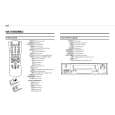
DSC-P100/P120
2-3-4. ADHERE THE ORNAMENTAL RING A
Apply an adhesive to four recesses on the top surface of the Barrier Assy. * Do not apply too much adhesive. (Make quantity of adhesives into the quantity in which a groove hides.) Meeting a �notch� of the Ornamental Ring A with a �projection� of the group-1 frame, push the Ornamental Ring A into the group-1 frame. * The projection of the spring for preventing static electricity must be tilted. Put the 60g weight on the Ornamental Ring A so that the Ornamental Ring A does not float up until the adhesive hardens. Note: Be careful not to give a shock. * After the weight was put, no gap must be present in full circumference between Ornamental Ring A and group-1 frame. A gap, if present, causes the crackle sound NG. * The weight must push in the Ornamental Ring A only. If the weight is put on the mold part of the Barrier Assy, the Ornamental Ring A will float up.
Do not put the weight on a black mold part. Notch Adhesive Adhesive Adhesive Projection
Adhesive Not gap in full circumference.
Completion after 30 minutes.
2-7
|