|
Dla tego produktu nie napisano jeszcze recenzji!
 ;
Dokładna dokumentacja, pomogła w szybkiej naprawie telewizora. Dziękuję!
 ;
jedyne do czego mogę mieć zastrzeżenie to jakość zdjęć zawartych w przesłanej instrukcji serwisowej ponieważ są fatalnej jakości, praktycznie nieczytelne. tak poza tym jestem zadowolony to jest to czego szukałem.
;
Wszystko w porządku.
Instrukcja czytelna i kompletna.
Dziękuję.
all right!
thank you.
;
Bardzo dobra instrukcja. Zawiera wszystko co potrzeba, polecam!
;
Instrukcja jest OK. Schematy czytelne, opisane niektóre procedury.
DV-533, DV-3310, DV-533K, DV-5310KD
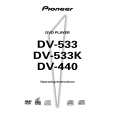
Disassembly of the Traverse Mechanism Assy and the Pickup Assy 1 2 3 4 5 6
Remove the Bonnet and Tray Panel. Remove the Front Panel. Remove the Bridge (Screw �1). Pull out the Tray and remove it while unhooking a Hook. Turn the Short SW to Short side. Remove three connectors.
7 8
Remove the Loading Mechanism Assy (Screws �4). Remove a screw.
Cautions:
Screw is locked with Silicone Adhesive. Please lock it with Silicone Adhesive when installs it. Remove the FFC Holder with the state which Flexible Cable was atatched. 8 Silicone Adhesive GEM1037 Traverse Mechanism Assy
9
4
-1
Hook Bridge
9 3
-2 -1
3
6 6
6
FFC Holder
4
-2 DVDM Assy Bottom View
RearView
Pickup Assy
Short
Open
5
Short SW
When Removing The Traverse Mechanism Assy
Caution in the tray insertion
In the Tray insertion, insert it after matching a triangle mark of the Loading Base and a position of pin of the Drive Cam. Triangle mark Loading Base
10 11 12
Remove the Pickup Flexible Cable Unhook ( �4) Remove the Traverse Mechanism Assy
Traverse Mechanism Assy
DVDM Assy Side
11 � 2
12
10
11 � 2
Traverse Mechanism Assy
Pin
Drive Cam
Exchange
73
|