|
Dla tego produktu nie napisano jeszcze recenzji!
 ;
Dokładna dokumentacja, pomogła w szybkiej naprawie telewizora. Dziękuję!
 ;
jedyne do czego mogę mieć zastrzeżenie to jakość zdjęć zawartych w przesłanej instrukcji serwisowej ponieważ są fatalnej jakości, praktycznie nieczytelne. tak poza tym jestem zadowolony to jest to czego szukałem.
;
Wszystko w porządku.
Instrukcja czytelna i kompletna.
Dziękuję.
all right!
thank you.
;
Bardzo dobra instrukcja. Zawiera wszystko co potrzeba, polecam!
;
Instrukcja jest OK. Schematy czytelne, opisane niektóre procedury.
DV-47A, DV-S733A, DV-747A
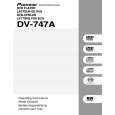
6.5 MECHANISM ADJUSTMENT
1 Tangential and Radial Height Coarse Adjustment START
� Remove the servo mechanism. � Remove a Spacer for height adjustment attached to the back side (shaded area) of the Servo Mechanism (Float Base) with nippers. Cautions: Because there is not a Spacer for height adjustment in adjustment after the second time, will keep it at need. (This parts is Traverse mechanism exclusive use of a model for 2001 years) 7.3mm
Servo Mechanism
Float Base
Put a spacer between a Tangential (or Radial) adjustment screw and Mechanism Base and turn each screw to adjust the height. (Refer to "6.1 ADJUSTMENT ITEMS AND LOCATION".)
Spacer for Height adjustment
Note: Turn the Short switch to Short side when removing the Pickup Flexible Cable. (Refer to "7.1.7 DISASSEBLY".)
Turn a flat side into bottom
73
|