|
|
|
Kategorie
|
|
Informacje
|
|
Polecamy
|
|
|
 |
|
|
Dla tego produktu nie napisano jeszcze recenzji!
Advanced Functions
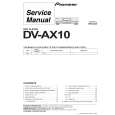
To display all of the settings at once Pressing DISPLAY while the picture quality setting adjustment screen is displayed enables all of the current settings to be viewed on one screen. Adjustments may also be made when this screen is displayed, by moving the cursor control joystick up and down to select a setting, and right and left to adjust the selected setting.
[Prog Motion]
Prog Motion Pure Cinema YNR CNR NR Sharpness High Sharpness Mid Detail Memory
fast Auto off off off soft soft off
Page 1/2 slow On Off max max max fine fine max 123
Off
This setting is effective for progressive scan output. Adjust for the level of motion occurring in the overall picture.
[Pure Cinema]
Page 2/2 max max 7.5 IRE red max + Off 1 2 3
White Level Black Level Black Setup Hue Chroma Level Chroma Delay Memory
min min 0 IRE green min �
Sets the progressive scan circuitry and DNR operation appropriately for playback of DVD-Video discs recorded from a film master. Normally this function should be set to �Auto�. Set [Pure Cinema] setting to �On� or �Off� if images on the screen are not clear (refer to below column).
[YNR]
Cuts the amount of digital noise in the Y (luminance) component of the video signal.
[CNR]
Cuts the amount of digital noise in the C (color) component of the video signal.
[NR]
Cuts the amount of digital noise in the picture. This setting is no effect for progressive scan output.
[Sharpness High]
Adjusts the sharpness of the picture in the upper frequency range.
[Sharpness Mid]
Adjusts the sharpness of the picture in the middle frequency range.
[Detail]
Adjusts the edges in the picture.
[White Level]
Adjusts the brightness of the lighter images in the picture.
[Black Level] Note If the Picture quality setting adjustment screen is opened during playback of a DVD being viewed in the letter box format, the screen may switch to the wide screen format. This is not a malfunction, and the screen will return to normal when the Picture quality setting adjustment screen is closed.
Adjusts the brightness of the darker images in the picture.
[Black Setup]
Adjusts the dynamic range of the darkness and lightness of black images in the picture.
[Hue]
Adjusts the red and green balance in the picture.
[Chroma Level]
Adjusts the depth of the colors in the picture. This setting is effective with animation and other sources with very colorful presentations.
[Chroma Delay]
ADVANCED FUNCTIONS
Adjust the delay of the Y (luminance) and C (color) components of the video signal. The �Pure Cinema� mode DVD-Video discs are recorded using one of two types of video signal: �Video Master� signals are recorded at a rate of 30 frames per second. �Film Master� signals are recorded at a rate of 24 frames per second. When a movie is shot, the film records the action at a rate of 24 frames per second (24 Hz). When DVD-Video discs are recorded using a film master, the [Pure Cinema] mode can convert these 24 recorded frames per second into a 60 frame per second progressive scan presentation resulting in a video image that best reflects the original film as recorded to the disc. Therefore, you can enjoy watching a cinematic presentation clearly and true to the original. Generally, you will be able to enjoy watching movies and other presentations with [Pure Cinema] set to �Auto�. However, if the video image is jagged or shakes during playback of certain discs, switch the [Pure Cinema] setting to either �On� or �Off�.
You can confirm whether or not a DVDVideo disc is recorded using a film master (24 frames per second) on the disc information screen. When a 24 frame per second film master progressive video image is recorded on the DVD Video disc, �#� is displayed.
Play # Tr. Rate :
1�1
1.19 8.9
To display the disc information screen, press DISPLAY on the remote control. Press DISPLAY repeatedly to display the screen shown above (page 61).
45
En
|
|
|
> |
|