|
Dla tego produktu nie napisano jeszcze recenzji!
 ;
...instruction is ok.
...instrukcja jest ok.
Thanks/Dzięki
;
Documentation made available quickly and It is good quality. Thanks.
DX-SX1H
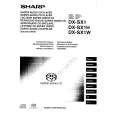
Checking the lead process
POWER-SW POWER PWB the electrolytic condensers (BI101)
Passing through
Power Transformer 10 pin lead
Check that the lead process is specified as above.
Connect the 2 pin lead from BI101 under the PWB via the nylon band A .
If any one of the bands shown in Fig. 66 is removed for some reason, be sure replace it to the original position and same appearance as before.
Tie the 2 pin lead at back of the PWB. Make the 2 pin lead Tie the 8 pin lead tight as possible. and the 10 pin lead at the two positions.
WIRING OF PRIMARILY SUPPLY LEADS (FOR U.K. ONLY)
Figure 66
Main PWB (CNP308)
� 66 �
Connect 2 pin lead via the 2 Pin lead position as shown in the figure and connected take up slack in the direction as from BI101. shown by the arrow to avoid stress on the PWB.
Tie the 2 pin lead at back of the PWB.
|