|
|
|
Kategorie
|
|
Informacje
|
|
Polecamy
|
|
|
 |
|
|
Dla tego produktu nie napisano jeszcze recenzji!
 ;
Dokładna dokumentacja, pomogła w szybkiej naprawie telewizora. Dziękuję!
 ;
jedyne do czego mogę mieć zastrzeżenie to jakość zdjęć zawartych w przesłanej instrukcji serwisowej ponieważ są fatalnej jakości, praktycznie nieczytelne. tak poza tym jestem zadowolony to jest to czego szukałem.
;
Wszystko w porządku.
Instrukcja czytelna i kompletna.
Dziękuję.
all right!
thank you.
;
Bardzo dobra instrukcja. Zawiera wszystko co potrzeba, polecam!
;
Instrukcja jest OK. Schematy czytelne, opisane niektóre procedury.
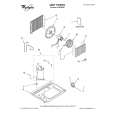
FO-50A FO-70A 4. Loading the fax paper (FO-20PRw)
� � Your fax machine prints incoming faxes on a special kind of paper called fax paper. The fax machine�s print head creates text and images by applying heat to the fax paper.
6 Insert the leading edge of the paper into the slot as shown. Continue
to push the paper through the slot until it comes out the opening in the front of the machine.
1Grasp the finger hold as shown and pull up to open the operation
panel.
7 Make sure the paper comes out straight, and then flip down the paper guide.
2Flip up the front paper guide.
FO-50 FO-70
FO-50
FO-70
Press the knob to make sure the front side of the metal guide is down.
3If you are loading paper that is 210 mm in width, place the paper roll
� The ribbed side of the shims should face in (toward each other).
shims on each side of the paper compartment. (Note that Sharp recommended paper, including the initial roll, is 216 mm in width.)
8 Close the operation panel, making sure it clicks into place. 4Unwrap the roll of thermal paper and insert the paper shaft. 5 Place the roll of fax paper in the compartment, making sure the ends
of the rod fit into the notches on each side of the compartment. � Important: The roll must be placed so the leading edge of the paper unrolls as shown. (The paper is only coated on one side for printing. If the roll is placed backwards, the paper will come out blank after printing.)
� A short length of the paper will be cut off. (FO-70) � A short length of the paper will feed out. Grasp the paper by the edge and pull upward to tear it off. (FO-50)
Click!
YES
NO!
1�6
|
|
|
> |
|